Copyright © 2013, 2014 K. D. Burdick
This manual was not produced by Nextdoor.com Inc. (“Nextdoor”), nor has Nextdoor sponsored or endorsed it. This documentation is provided “as is,” and K. D. Burdick makes no representations as to its accuracy or suitability for any purpose. Any use of this documentation or the information contained herein is at the risk of the user. This documentation may include technical or other inaccuracies or typographical errors.
Nextdoor™ is either a registered trademark or trademark of Nextdoor.com Inc. Nextdoor screenshots reprinted with permission from Nextdoor.
Adobe® Reader® is a registered trademark of Adobe Systems Incorporated in the United States and/or other countries. AOL® is a registered trademark of AOL Inc. iPad®, iPhone®, iPod touch®, iTunes®, and Mac OS® are registered trademarks of Apple Inc. Facebook® is a registered trademark of Facebook, Inc. Android™ and Gmail™ are trademarks of Google Inc. LinkedIn® is a registered trademark of LinkedIn in the U.S. and/or other countries. Excel®, Hotmail®, Microsoft®, Outlook®, Windows®, and Word™ are either registered trademarks or trademarks of Microsoft Corporation in the United States and/or other countries. Palm® is a registered trademark of Palm Inc., which was acquired by HP in 2010. Yahoo!® is a registered trademark of Yahoo! Inc.
July 2014
Many thanks to all the wonderful folks at Nextdoor for creating the social network for neighborhoods! And specifically, I'd like to thank Gordon (who I first encountered through Nextdoor's National Leads Forum) and Jennifer from the Nextdoor Communications Team, who have both been incredibly helpful and encouraging during the development of the Guide. -- KDB
Table of Contents
- 1. Introduction
- 2. How to Join Nextdoor
- 3. Rules for Nextdoor
- 4. How to Sign In and Out of the Nextdoor Website
- 5. The Nextdoor Home Page
- 6. Nearby Neighborhoods
- 7. How to Change Your Nextdoor Settings
- 8. How to Read and Send Messages
- 9. Groups
- 10. How to Find a Neighbor on Nextdoor
- 11. How to Use the Neighborhood Map
- 12. How to Use Events
- 13. How to Invite Your Neighbors to Join Nextdoor
- 14. How to Use Nextdoor By Email
- 15. How to Get Help
- 16. Nextdoor for iPhone
- 16.1. Nextdoor for iPhone Version 1 (for iOS 6)
- 16.1.1. How to Install Nextdoor for iPhone
- 16.1.2. How to Start Nextdoor for iPhone and Sign In
- 16.1.3. The Home Screen on Nextdoor for iPhone
- 16.1.4. Notifications on Nextdoor for iPhone
- 16.1.5. How to Read Messages with Nextdoor for iPhone
- 16.1.6. How to Post Public Messages with Nextdoor for iPhone
- 16.1.7. How to Send and Read Private Messages with Nextdoor for iPhone
- 16.1.8. How to Use Groups on Nextdoor for iPhone
- 16.1.9. How to Find a Neighbor with Nextdoor for iPhone
- 16.1.10. How to Invite Your Neighbors to Join with Nextdoor for iPhone
- 16.1.11. How to Change Your Settings with Nextdoor for iPhone
- 16.1.12. How to Get Help for Nextdoor for iPhone
- 16.2. Nextdoor for iPhone Version 2 (for iOS 7)
- 17. Nextdoor for Android
- 17.1. How to Install Nextdoor for Android
- 17.2. How to Start Nextdoor for Android and Sign In
- 17.3. The Home Screen on Nextdoor for Android
- 17.4. Notifications on Nextdoor for Android
- 17.5. How to Read Messages with Nextdoor for Android
- 17.6. How to Post Public Messages with Nextdoor for Android
- 17.7. How to Send and Read Private Messages with Nextdoor for Android
- 17.8. How to Use Groups on Nextdoor for Android
- 17.9. How to Find a Neighbor with Nextdoor for Android
- 17.10. How to Invite Your Neighbors to Join with Nextdoor for Android
- 17.11. How to Change Your Settings with Nextdoor for Android
- 17.12. How to Get Help for Nextdoor for Android
This chapter gives some basic information about the contents of this manual and how to use the manual.
Nextdoor.com (“Nextdoor”) is a company that started in San Francisco in 2010. Nextdoor hosts your neighborhood's Nextdoor website for free. As of July 2014, more than 38,000 neighborhoods in all 50 states use Nextdoor.[1]
Nextdoor's Manifesto:
We are for neighbors.
For neighborhood barbecues. For multi-family garage sales. For trick-or-treating.
We're for slowing down, children at play.
We're for sharing a common hedge and an awesome babysitter.
We're for neighborhood watch. Emergency response. And for just keeping an eye out for a lost cat.
We believe waving hello to the new neighbor says, “Welcome” better than any doormat.
We believe technology is a powerful tool for making neighborhoods stronger, safer places to call home.
We're all about online chats that lead to more clothesline chats.
We believe fences are sometimes necessary, but online privacy is always necessary.
We believe strong neighborhoods not only improve our property value, they improve each one of our lives.
We believe that amazing things can happen by just talking with the people next door.
We are Nextdoor. We are simply you and your neighbors, together.
Pictures in this manual are from the “Nextdoor Alta Hill” website at http://demo.trynextdoor.com/vip. Nextdoor Alta Hill is an example website that Nextdoor made to use for tests and demonstrations.
This manual identifies information that is good to know or that will possibly help you do a task as a “note.”
Note
Here is an example of a note.
This manual identifies information that can help you prevent a problem or an error as a “caution.”
Caution
Here is an example of a caution.
When this manual tells you to:
“Click” an object (for example: “Click the button”):
Move the mouse cursor on top of the object.
Press the left mouse button one time then release the button.
“Right-click” an object (for example: “Right-click the link”):
Move the mouse cursor on top of the object.
Press the right mouse button one time then release the button.
“Click and drag” an object (for example: “Click and drag the map marker to your street address”):
Move the mouse cursor on top of the object.
Press the left mouse button and hold the button down.
Move the mouse cursor to the new location.
Release the left mouse button.
“Scroll up” or “scroll down” a page (for example: “Scroll down the page to see more messages”):
If your mouse has a small wheel between the left and right mouse buttons, you can use the wheel to scroll up and down. Pull the wheel towards you to scroll down the page. Push the wheel away from you to scroll up the page.
If a page contains more information than will fit on one screen, you will see a “scroll bar” at the right side of the page:
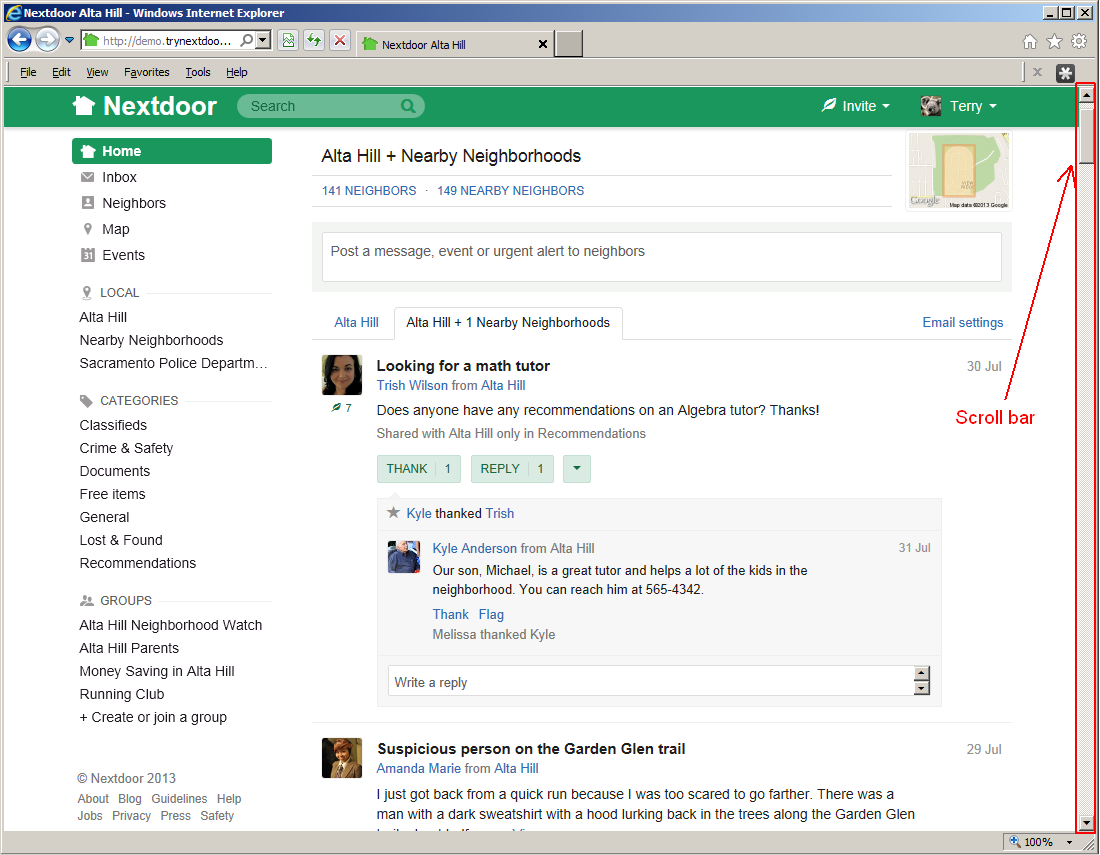
To scroll the page up one line at a time, click the up-arrow symbol at the top of the scroll bar. To scroll down in the page one line at a time, click the down-arrow symbol at the bottom of the scroll bar.
To scroll the page up one window at a time, click above the gray box on the scroll bar. To scroll down in the page one window at a time, click below the gray box on the scroll bar.
You can also click and drag the gray box on the scroll bar to move quickly to a different position on the page.
To do some tasks, you will click buttons, links, or menus on the Nextdoor website:
Buttons on the website will be shown in a special font. For example: , , .
Links on the website will be shown in a special font. For example: Inbox, Neighbors, Map.
Menu names will be shown in a special font. For example: , .
When you click a menu, a list of items will come into view. Click the item that you want to use.
For example, you will see a menu with your first name (such as ) at the top right corner of each Nextdoor page. When you click this menu, a list of items will come into view. You can click these items to set up your profile and your Nextdoor settings. For help with your profile and settings, see Chapter 7, How to Change Your Nextdoor Settings, Section 7.1, “Your Profile”.
This manual uses special symbols and standards to show you how to enter information:
When you must press a key on the keyboard, this manual will show the name of the key between two angled brackets.
For example: <A>, <B>, <C>, <Enter>, <Del>, <Backspace>, <Ctrl>.
Note
The names of the keys on your keyboard will possibly be different from the names shown in this manual.
For example: An alternative name for the <Del> key is <Delete>.
If you must press more than one key to do a task, this manual will show a special symbol between the keys.
For example, if this manual tells you to “Press <Ctrl>+<C>”, you will:
Press and hold down the <Ctrl> key.
Press and release the <C> key.
Release the <Ctrl> key.
If you must type some information, this manual will show the information in a special font.
For example: “Type
74104in the ZIP box.”
Before you can use Nextdoor, you must make a Nextdoor account.
To join Nextdoor, you must:
live or own property, or both, in the Nextdoor community that you want to join.
be 13 years old or older. If you are a minor, get the approval of your parent or guardian before you use Nextdoor.
use your real name. Nextdoor makes this mandatory because “Using your real name and real identity helps to build trust among neighbors.”
If more than one person lives at your address, Nextdoor recommends that each person has a Nextdoor account. This helps neighbors send messages to only one person.
You can read Nextdoor's full Member Agreement at https://nextdoor.com/member_agreement/.
If you received an invitation to join Nextdoor, use this procedure to join:
If you received the invitation by email, click the link or the green button in the email.
If you received the invitation by text message on your iPhone or Android device, tap the link in the text message.
If you received the invitation by postcard or flyer, use your web browser (such as Internet Explorer, Chrome, Firefox, or Safari) to go to the web address shown on the postcard or flyer.
Note
The term “flyer” includes business cards and door hangers.
Note
If you received a flyer, you can do the procedure in Section 2.2.2, “Join Without an Invitation” as an alternative to this procedure. Nextdoor will let you enter the code from the flyer when you make your Nextdoor account.
If you received the invitation by flyer, a “Join the free, private social network for your neighborhood” page will come into view.
If the Invite code box is empty, click in the Invite code box. Type the code from the flyer.
Click in the ZIP box. Type your ZIP code.
Click the green button.
A “Welcome! Please confirm your address in ” page will come into view in your web browser.
Click in the Email address box. Type your email address (such as
john.smith@gmail.com).Click in the Street address box. Type your street address (such as
1234 E Main St).Note
Be sure to include the correct suffix, such as
Ave,Pl, orStin your address.Click in the ZIP box. Type your ZIP code. (You will not need to type your ZIP code if you received the invitation by flyer.)
Note
After you type the ZIP code, boxes with city and state information will come into view above the ZIP box. Be sure that the location is correct.
Click the green button.
Do the procedure in Section 2.2.3, “Confirm Your Address”.
If you meet the requirements to join Nextdoor, you do not have to wait for an invitation!
Use this procedure to join without an invitation:
Use your web browser (such as Internet Explorer, Chrome, Firefox, or Safari) to go to https://nextdoor.com:

Click in the Email address box. Type your email address (such as
john.smith@gmail.com).Click in the Street address box. Type your street address (such as
1234 E Main St).Note
Be sure to include the correct suffix, such as
Ave,Pl, orStin your address.Click in the ZIP box. Type your ZIP code.
Note
After you type the ZIP code, boxes with city and state information will come into view above the ZIP box. Be sure that the location is correct.
Click the green button.
Note
If Nextdoor cannot find a street address that agrees with the address you typed:
A new page with the message
Help locate your exact addresswill come into view. You will see a map with a green map marker below the message.Click and drag the map marker to your street address.
A message will come into view:
Is this your residence?If the location is your address, click the button.
If the location is not your address, click the button.
Note
If a page with the message
Your address isn't within the borders of a Nextdoor neighborhoodcomes into view, possibly you typed an address:that is in a neighborhood that does not have a Nextdoor site.
that is an empty lot, a common area (such as a clubhouse), or some other address that cannot be used to join Nextdoor.
Use your web browser's “back” button to go back one page. Then type your information again. Be sure to type your street address correctly.
If you are sure that you typed your address correctly, click the Help link at the bottom right corner of the page. Nextdoor's “help” page will come into view. For more information on Nextdoor's help page, see Chapter 15, How to Get Help, Section 15.1, “Nextdoor's Help Page”.
Do the procedure in Section 2.2.3, “Confirm Your Address”.
After you give Nextdoor your information, you will make your Nextdoor account and possibly confirm your address:
A page with the message
Good news! We found your addresswill come into view: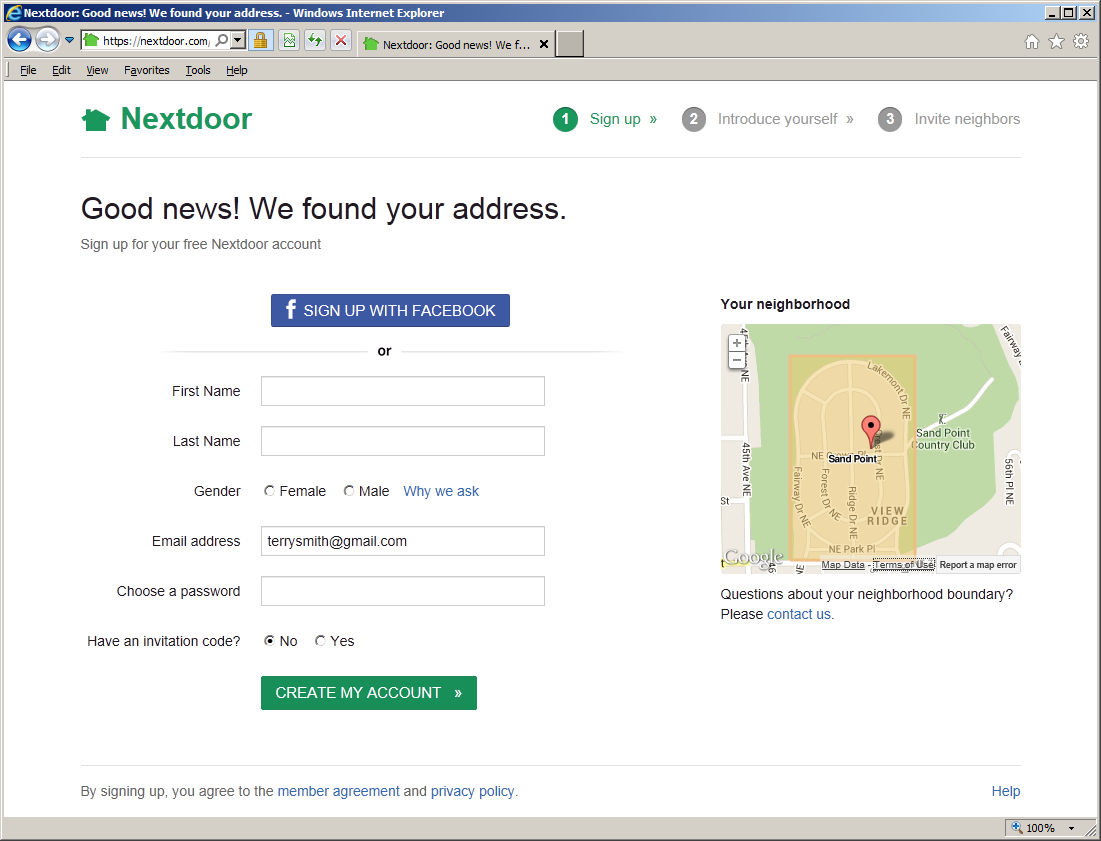
If you have a Facebook account and want to use it to make your Nextdoor account:
Click the blue button. A Facebook form will come into view:
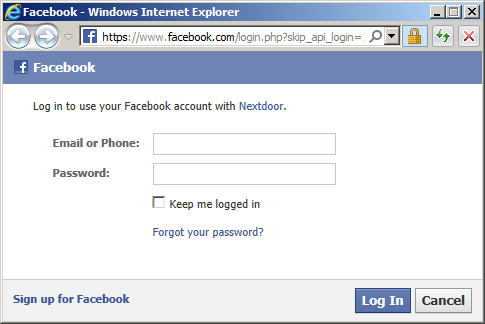
Click in the Email or Phone box. Type the email address or phone number for your Facebook account.
Click in the Password box. Type your Facebook password.
Click the blue button.
If you do not have a Facebook account, or do not want to use your Facebook account to make your Nextdoor account:
Click in the First Name box. Type your first name.
Click in the Last Name box. Type your last name.
Note
You must use your real name (the name by which your friends, relatives, and neighbors know you) for your Nextdoor account.
Click Female or Male.
The Email address box will contain your email address. Be sure your email address is correct.
Click in the Choose a password box. Type the password you want to use for Nextdoor.
If a neighbor gave you a flyer that contains an invitation code:
Click Yes to the right of Have an invitation code? An empty box will come into view below the word Yes.
Click in the empty box. Type your invitation code.
Note
Invitation codes are not necessary to join Nextdoor. If you enter an invitation code when you make your Nextdoor account, the neighbor who invited you will get credit for the invitation.
Click the button.
Possibly a page with the message
Great! The next step is to verify your addresswill come into view. This page lists procedures you can use to show Nextdoor that you live at the address you gave.Note
You will possibly see a different list of items.
Click one item on the list:
Credit or debit card (instant and free): Click this to let Nextdoor verify your address with a credit or debit card. Click in the in the Card number box, then type your credit or debit card number.
Note
The billing address for your card must agree with the address you gave Nextdoor.
Click the button.
Phone (instant and free): Click this to let Nextdoor verify your address with an automatic phone call to your home or mobile phone. Click in the Phone number box, then type your phone number .
Note
The billing address for your phone must agree with the address you gave Nextdoor.
Click the button.
Postcard (takes 3-5 days and free): Click this to tell Nextdoor to send a postcard to your home.
When you receive the postcard:
Use your web browser to go to https://www.nextdoor.com/postcard.
Sign in to Nextdoor:
If you used Facebook to make your Nextdoor account:
Click the blue button.
Click in the Email or Phone box. Type the email address or phone number for your Facebook account.
Click in the Password box. Type your Facebook password.
Click the blue button.
If you did not use Facebook to make your Nextdoor account:
Click in the Email address box. Type your email address.
Click in the Password box. Type your Nextdoor password.
Click the green button.
A page with the message
Verification by postcardwill come into view.Click in the Postcard code box. Type the code from your postcard.
Click the button.
After you make your account and confirm your address (if necessary), you will have full access to Nextdoor.
Nextdoor has a set of guidelines that are recommended for all neighborhoods.
Nextdoor's “Guidelines for Neighborly Behavior” are:
Our mission is to use the power of technology to build stronger and safer communities everywhere. We hope to inspire each Nextdoor member to be a better neighbor. We challenge members to hold themselves, and each other, to the highest standard of neighborly behavior:
Treat everyone with respect:
Assume good intentions in others and give them the benefit of the doubt.
Disagree without being disagreeable; focus on issues and do not engage in personal attacks.
Practice moderation and do not over post in a way that dominates conversations.
Send private messages or post to a Group when a limited audience is more appropriate.
Refrain from using profanity or posting messages that will be perceived as discriminatory.
Share helpful information:
Answer fellow members’ questions.
Share information about crime and safety issues.
Recommend local businesses and services (without spamming or inappropriate self-promotion).
Sell, share, or give away personal items that you no longer want or need.
Discuss community issues (but avoid campaigning).
Spread the word about local events.
Provide support to fellow members in need.
Honestly represent yourself:
Use your real name, not an alias, pseudonym, or abbreviation.
Join as an individual not as a couple, family, or organization.
Take the time to add a photo and to fill out your profile.
To sign in to your Nextdoor account with a web browser (such as Internet Explorer, Chrome, Firefox, or Safari):
Use your web browser to go to https://nextdoor.com and click the black button at the top right corner of the page:

Note
Pictures in this manual are from the “Nextdoor Alta Hill” website. Nextdoor Alta Hill is an example website that Nextdoor made to use for tests and demonstrations. The information on Nextdoor Alta Hill is not real.
If you used Facebook to make your Nextdoor account:
Click the blue button.
Click in the Email or Phone box. Type the email address or phone number for your Facebook account.
Click in the Password box. Type your Facebook password.
Click the blue button.
If you did not use Facebook to make your Nextdoor account:
Click in the Email address box. Type your email address.
Click in the Password box. Type your Nextdoor password.
Click the green button.
The Nextdoor home page will come into view.
To sign out of Nextdoor:
Click your name near the top right corner of the home page.
On the menu that drops down, click .
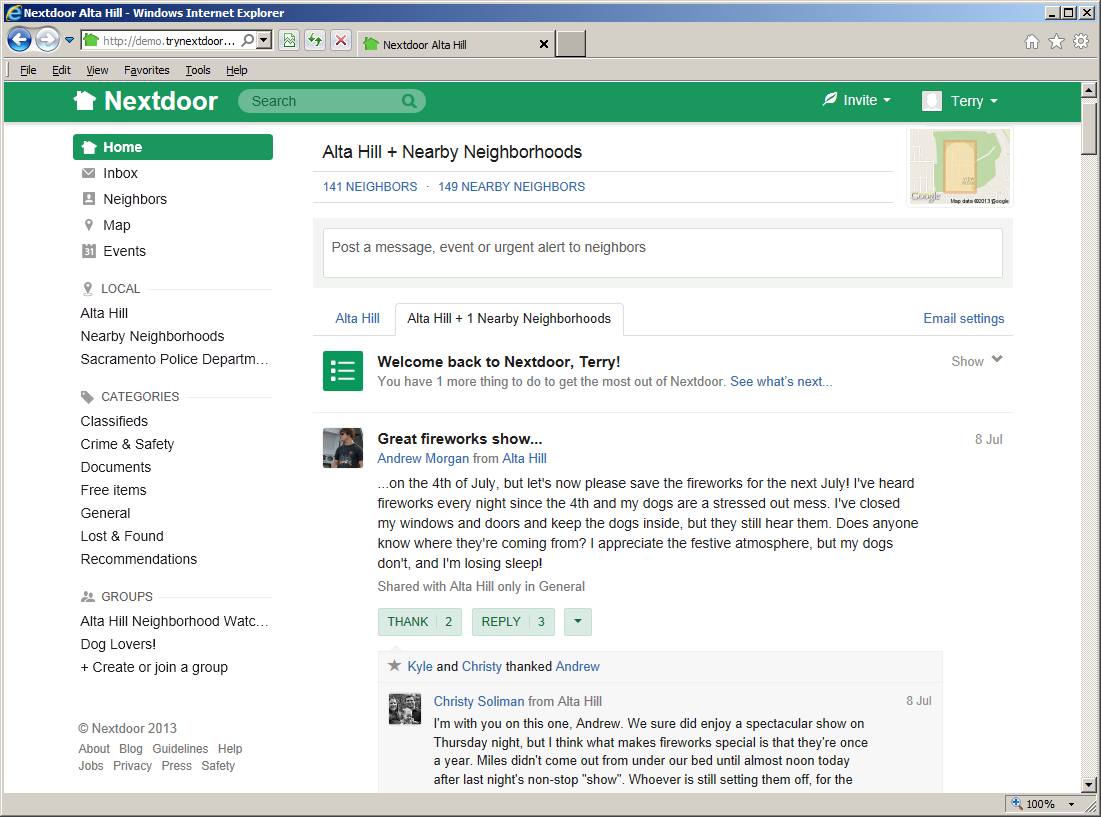
After you sign in to Nextdoor, the home page will come into view:
Note
Nextdoor uses a website design method known as “responsive design.” Websites that use responsive design adjust automatically to different devices, web browsers, and web browser window sizes.
The pictures of the “Nextdoor Alta Hill” website in this manual were made with a full-size web browser window on Microsoft Windows. If you use the Nextdoor website in a small web browser window, or on a smartphone or tablet computer, the website will look different. On devices with very small screens (such as smartphones), some functions will not be available.
You will see a ≡ symbol at the top left corner of a small web browser window. (If you see the ≡ symbol, the window is too small to show the list of links at the left side of the window. On some devices, if you turn the device to the right or left, possibly you will see the list of links.) Click or tap the ≡ symbol to see the links that are usually at the left side of the window.
Nextdoor's performance on a smartphone will possibly be better with a mobile app than with a mobile web browser. For more information on Nextdoor for iPhone, see Chapter 16, Nextdoor for iPhone. For more information on Nextdoor for Android, see Chapter 17, Nextdoor for Android.
From the home page, you can:
use the Search box to find messages that contain specified words. For help with the Search box, see Chapter 8, How to Read and Send Messages, Section 8.4, “How to Search for Messages”.
use the menus at the top right corner of the page:
Invite: Click this menu to invite your neighbors to join Nextdoor. For help with invitations, see Chapter 13, How to Invite Your Neighbors to Join Nextdoor.
Click your name at the top right corner of the page to change your Nextdoor settings. For help with your Nextdoor settings, see Chapter 7, How to Change Your Nextdoor Settings.
post new public messages. For help with public messages, see Chapter 8, How to Read and Send Messages, Section 8.1, “Public Messages”.
read messages that neighbors posted. For help with this, see Chapter 8, How to Read and Send Messages, Section 8.1, “Public Messages”.
thank neighbors for their messages, or reply to messages. For help with this, see Chapter 8, How to Read and Send Messages, Section 8.1.1, “How to Thank and Reply”.
move messages to different categories to help neighbors find information more easily. For help with this, see Chapter 8, How to Read and Send Messages, Section 8.1.2, “How to Change a Message's Category”.
“flag” messages that contain bad language, advertising, or other inappropriate information. For help with this, see Chapter 8, How to Read and Send Messages, Section 8.1.3, “How to Flag Messages”.
welcome new members to Nextdoor. For help with the button, see Chapter 13, How to Invite Your Neighbors to Join Nextdoor, Section 13.5, “How to Welcome New Members”.
use links at the left side of the page to see different areas of the website:
Home: Click this link to go to the Nextdoor home page.
Inbox: Click this link to see private messages that you sent to other neighbors, or that other neighbors sent to you. For help with your inbox, see Chapter 8, How to Read and Send Messages, Section 8.3, “Private Messages”.
Neighbors: Click this link to see a list of Nextdoor members in your neighborhood. For help with the neighbors list, see Chapter 10, How to Find a Neighbor on Nextdoor.
Map: Click this link to see a map of your neighborhood. For help with the neighborhood map, see Chapter 11, How to Use the Neighborhood Map.
Events: Click this link to see a calendar of future and past events. For help with events, see Chapter 12, How to Use Events.
A “LOCAL” section that includes:
your neighborhood's name: Click this link to see only messages from your neighborhood.Nearby Neighborhoods: Click this link to see messages from your neighborhood, and also residents of Nearby Neigborhoods. For help with Nearby Neighborhoods, see Chapter 6, Nearby Neighborhoods.
If your city is a member of the Nextdoor City Program, a link to information from your city officials, police department, and/or fire department. For more information on the Nextdoor City Program, go to http://help.nextdoor.com/customer/portal/articles/1148541-what-is-the-nextdoor-city-program-?b_id=98.
A “CATEGORIES” section that includes:
Classifieds: Click this link to see messages about items that neighbors want to sell or buy.
Crime & Safety: Click this link to see messages about crime and safety.
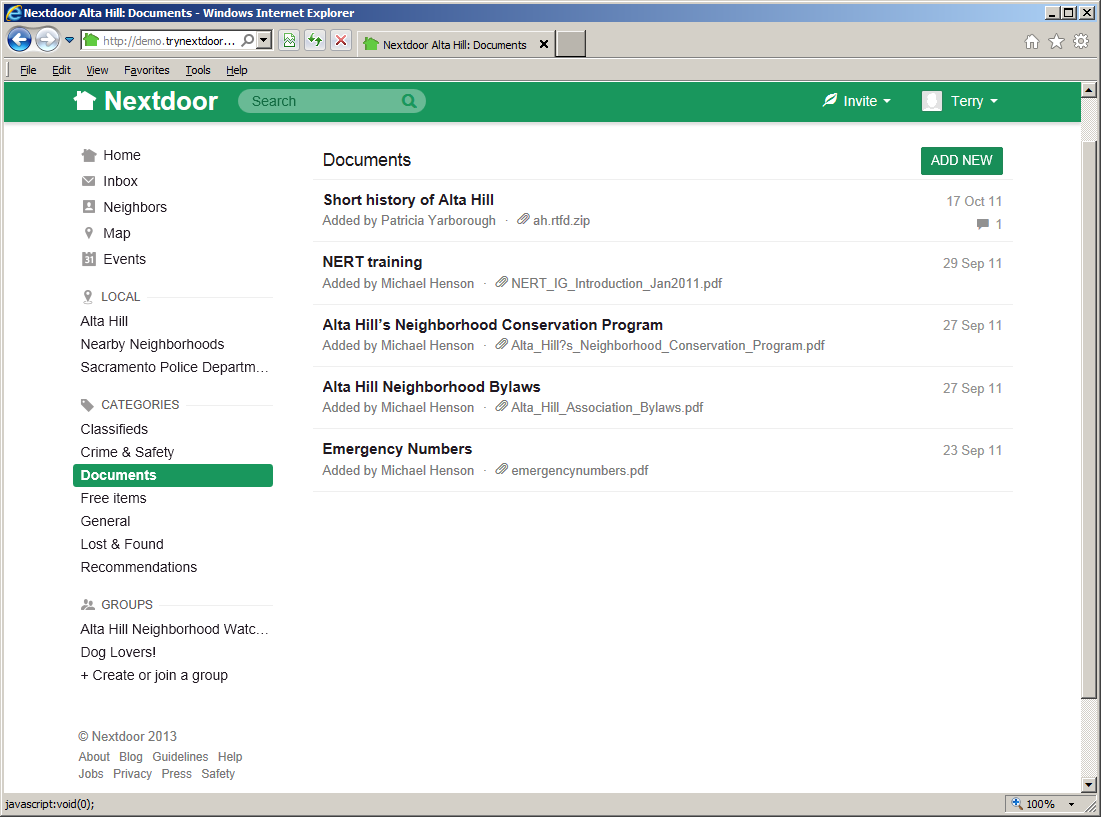
Documents: Click this link to see a list of files that neighbors share with other neighbors.
Files can be in different formats, for example:
Picture or photo files can have names that end with
.GIF,.JPG,.JPEG, or.PNG.Portable Document Format files have names that end with
.PDF. You can open PDF files with software such as Adobe Reader.Microsoft Word format files have names that end with
.DOCor.DOCX. You can open these files with Microsoft Word.Microsoft Excel format files have names that end with
.XLSor.XLSX. You can open these files with Microsoft Excel.
To open files in the Documents section, you must have the necessary software installed on your computer. For example, to open a PDF file, you must have Adobe Reader (or some other software that can open PDF files) installed on your computer. To open a Microsoft Word document, you must have Microsoft Word (or some other software that can open Word files) installed on your computer.
Free items: Click this link to see messages about items that neighbors want to give away for free.
General: Click this link to see messages that do not fit into some other category.
Lost & Found: Click this link to see messages about lost or found pets or items.
Recommendations: Click this link to see messages about companies or services neighbors used, and if the neighbors recommend those companies or services.
For help with public messages, see Section 8.1, “Public Messages”.
A “YOUR GROUPS” section that shows links to the public and private groups of which you are a member, and a Browse all
#groups link. For help with groups, see Chapter 9, Groups.A group of links to Nextdoor web pages, including:
About: Click this link to see information about Nextdoor.
Guidelines: Click this link to see the guidelines to use Nextdoor.
Help: Click this link to go to Nextdoor's “help” page. For help with Nextdoor's “help” page, see Chapter 15, How to Get Help.
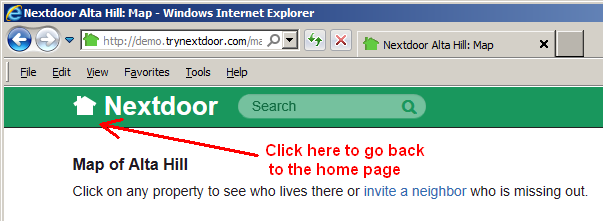
The list of links you see at the left side of the home page will also be on most other Nextdoor pages. Some pages do not have the links at the left side of the page. (For example, the “Map” page does not have the links at the left side of the page.) To go back to the home page, click the picture of a house or the word Nextdoor at the top left corner of the page:
Nextdoor lets you meet other residents of your neighborhood online and share information with them. If you want, you can also share information with residents of other neighborhoods that are near your neighborhood. Nextdoor refers to these as “Nearby Neighborhoods.”

If you post a new public message on Nextdoor, you can share the message with residents of your neighborhood only. Or, you can share the message with your neighborhood and with some or all of the Nearby Neighborhoods. If you share messages with Nearby Neighborhoods or reply to shared messages, residents in those neighborhoods will see some information about you. You control how much of your information residents of Nearby Neighborhoods see.
Note
If you do not post public messages to Nearby Neighborhoods, residents in those neighborhoods will not see your information at all.
Residents in Nearby Neighborhoods can share information with your neighborhood.
Information that is good to share with Nearby Neighborhoods includes:
messages about crime and safety
messages about lost and found pets and items
messages about issues that are applicable to more than one neighborhood, such as street work
invitations to garage sales, open houses, and other public events
recommendations for companies and services
But if you do not want to see information from one or more Nearby Neighborhoods, you can “turn off” a Nearby Neighborhood.
For help with your Nearby Neighborhood settings, see Section 7.2.3, “Nearby Neighborhoods Settings”.
You can change your Nextdoor profile to control the information that your neighbors see about you. You can change your Nextdoor settings to control the type of information that Nextdoor sends you, and when.
Your profile is the information that neighbors can see about you. Your profile must contain your real first and last name, and the name of your street. You can add other information to your profile if you want.
To change your profile:
Click your name near the top right corner of the home page.
On the menu that drops down, click . Your profile page will come into view.

Click the pale green button below your name. An “Edit profile” page will come into view:
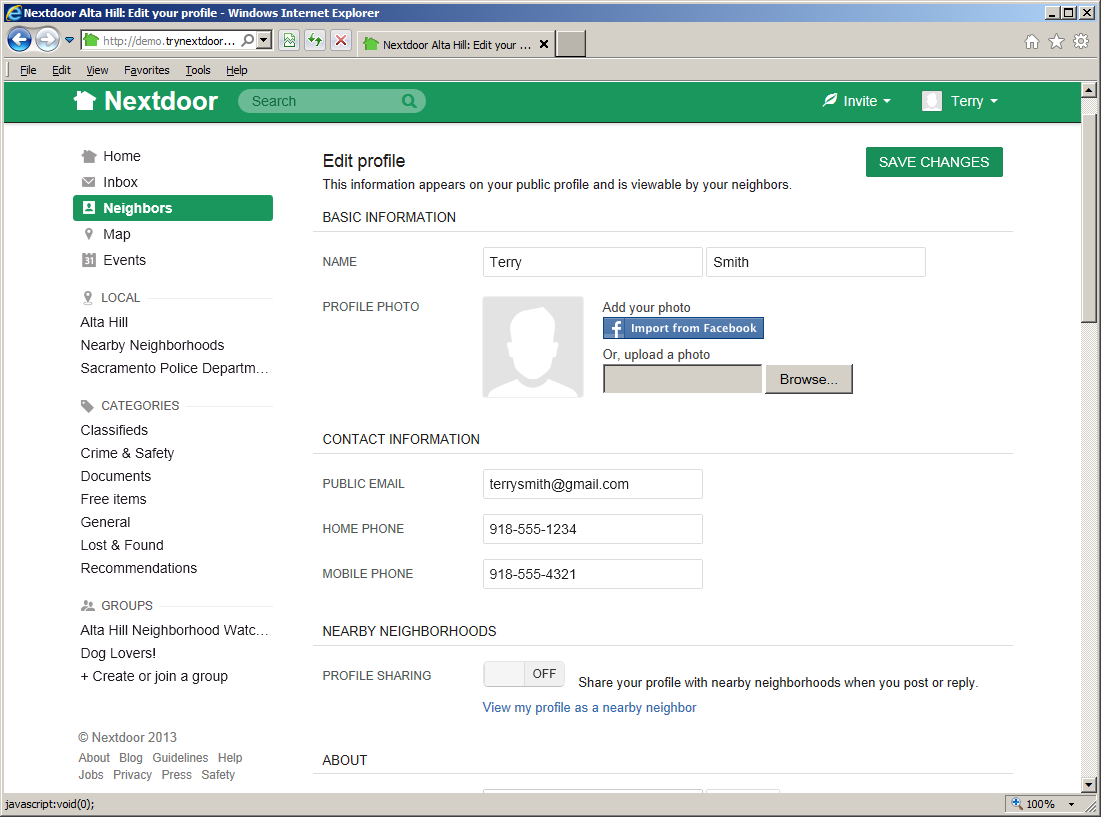
Complete the boxes on the page:
Note
You must use your real first and last name. The name of your street will be shown on your profile. All other information is optional.
BASIC INFORMATION:
NAME: If your name is not correct, click in the first box and type your name. Click in the second box and type your last name.
PROFILE PHOTO: If you have a file that contains your photo on your computer, you can add the photo to your profile.
To add your photo:
Click the button. A dialog box from your computer will come into view:
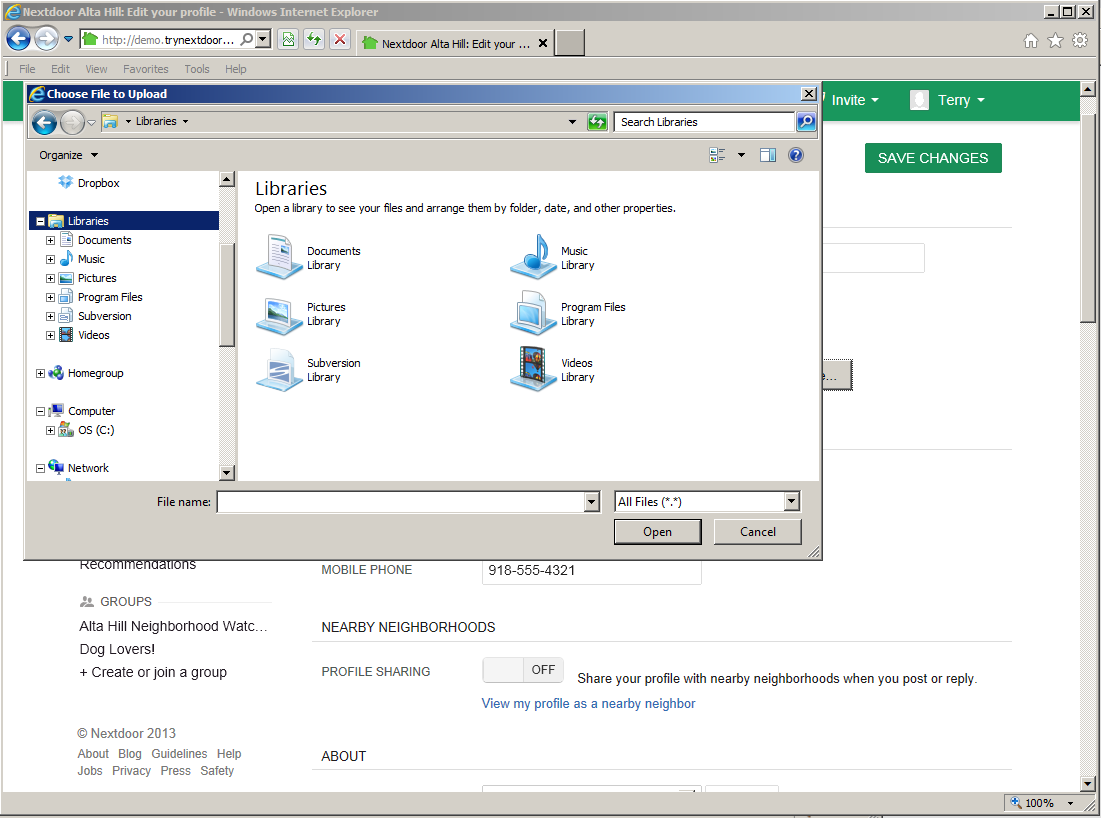
Use the dialog box to find the directory or folder on your computer that contains the photo file.
When you find the file, select it.
Your profile page will come back into view. You will see your photo on your profile after you save your changes.
CONTACT INFORMATION:
PUBLIC EMAIL: It is not necessary for your neighbors to know your email address to send you private messages through Nextdoor. But if you want them to know your email address, click in the PUBLIC EMAIL box. Then type your email address.
HOME PHONE: If you want your neighbors to know your home phone number, click in the HOME PHONE box. Then type your home phone number.
MOBILE PHONE: If you want your neighbors to know your mobile (cell phone) number, click in the MOBILE PHONE box. Then type your cell phone number.
MOBILE APPS: If you use the Nextdoor for Android or Nextdoor for iPhone app, Nextdoor will show a message about that. For help with the Nextdoor for Android app, see Chapter 17, Nextdoor for Android. For help with the Nextdoor for iPhone app, see Chapter 16, Nextdoor for iPhone.
NEARBY NEIGHBORHOODS: Nearby Neighborhoods are neighborhoods near your neighborhood that also use Nextdoor. When you post a public message on Nextdoor, you can post the message to your neighborhood only, or to your neighborhood and Nearby Neighborhoods. After you post a message to Nearby Neighborhoods, residents in those neighborhoods can see some information on your profile. But you control how much information they can see.
Note
If you do not post public messages to Nearby Neighborhoods, residents in those neighborhoods will not see your information at all.
PROFILE SHARING: If PROFILE SHARING is set to
OFF, residents in Nearby Neighborhoods will see only your name, your profile photo (if you have one), and your neighborhood's name. If PROFILE SHARING is set toON, residents in Nearby Neighborhoods will see your full profile.To see how your profile looks to residents in Nearby Neighborhoods, click the View my profile as a nearby neighbor link. A new window will open in your web browser to show your profile.
To change how your profile looks to residents in Nearby Neighborhoods, click and drag the PROFILE SHARING button. For example, if PROFILE SHARING is set to
ON, Nearby Neighborhoods will see your full profile. But if you want Nearby Neighborhoods to see only your name, photo, and neighborhood name, click and drag the button to theOFFposition.
ABOUT: All the information in this section is optional. If you want your neighbors to know more about you, you can type information in the RESIDENT SINCE, HOMETOWN, OCCUPATION, BIOGRAPHY, INTERESTS, and/or FUN FACTS boxes.
FAMILY: All the information in this section is optional.
SPOUSE/PARTNER: If you want your neighbors to know the name of your spouse or partner, click in the SPOUSE/PARTNER box. Then type the name of your spouse or partner.
If your spouse/partner is not a member of Nextdoor, you can click in the Email address box. Then type their email address to invite them to join Nextdoor.
Note
Nextdoor recommends that each person in a home has a Nextdoor account. This helps neighbors send messages to the person they want to speak to.
CHILDREN: If you want your neighbors to know the name of your child(ren), click in one of the Name boxes. Then type the name of your child.
If you want your neighbors to know your child's age:
Click the down-button symbol at the right side of the box to the right of the child's name.
On the list that drops down, click the month in which the child was born.
Click in the YYYY box. Type the year the child was born (for example,
1996).
Do this step again for each of your children.
PETS: If you want your neighbors to know about your pet(s):
Click in one of the Name boxes. Type the name of your pet.
Click the down-button symbol at the right side of the box to the right of the pet's name.
On the list that drops down, click Dog, Cat, Bird, Fish, or Other.
Click in the Breed box. Type your pet's breed.
HOME: You can tell Nextdoor to show your neighbors your full address, or only the name of your street.
SHOW MY ADDRESS AS: Click your full address or the name of your street.
After you complete the changes, click the button.
Note
There are two buttons: one near the top right corner of the page, and one at the bottom left corner of the page.
Your Nextdoor settings include:
if and when Nextdoor sends you emails
the mobile (cell phone) number that Nextdoor uses to send you urgent messages (if you turn this setting on)
your settings for Nearby Neighborhoods:
which neighborhoods you want to see messages from
if and when Nextdoor sends you messages about Nearby Neighborhoods
how much information on your profile residents in Nearby Neighbhoods can see
Note
If you do not post public messages to Nearby Neighborhoods, residents in those neighborhoods will not see your information at all.
the email address that Nextdoor uses to send you messages
your Nextdoor password
your street address
To change your Nextdoor settings:
Click your name near the top right corner of the home page.
On the menu that drops down, click . The “Settings” page will come into view:

The EMAIL settings page is selected automatically. (This page shows the email address that Nextdoor uses to send you messages, and lets you control when you want Nextdoor to send you emails. For help with email settings, see Section 7.2.1, “Email Settings”.)
If you want to change other settings, click:
MOBILE ALERTS to tell Nextdoor if you want to receive urgent messages on your mobile (cell) phone. If you do want to receive urgent messages, you use the Mobile Alerts page to tell Nextdoor your cell phone number. For help with Mobile Alerts settings, see Section 7.2.2, “Mobile Alerts Settings”.
NEARBY NEIGBHORHOODS to control:
the Nearby Neighborhoods from which you see messages
when you get email from Nearby Neighborhoods
how much of your profile information residents in Nearby Neighbhoods can see
For help with Nearby Neighborhoods settings, see Section 7.2.3, “Nearby Neighborhoods Settings”.
ACCOUNT to change your email address, Nextdoor password, or street address. The page also includes a link to deactivate your Nextdoor account.
The EMAIL settings page shows the email address that Nextdoor uses to send you messages. You can also use this page to tell Nextdoor if and when to send you emails:
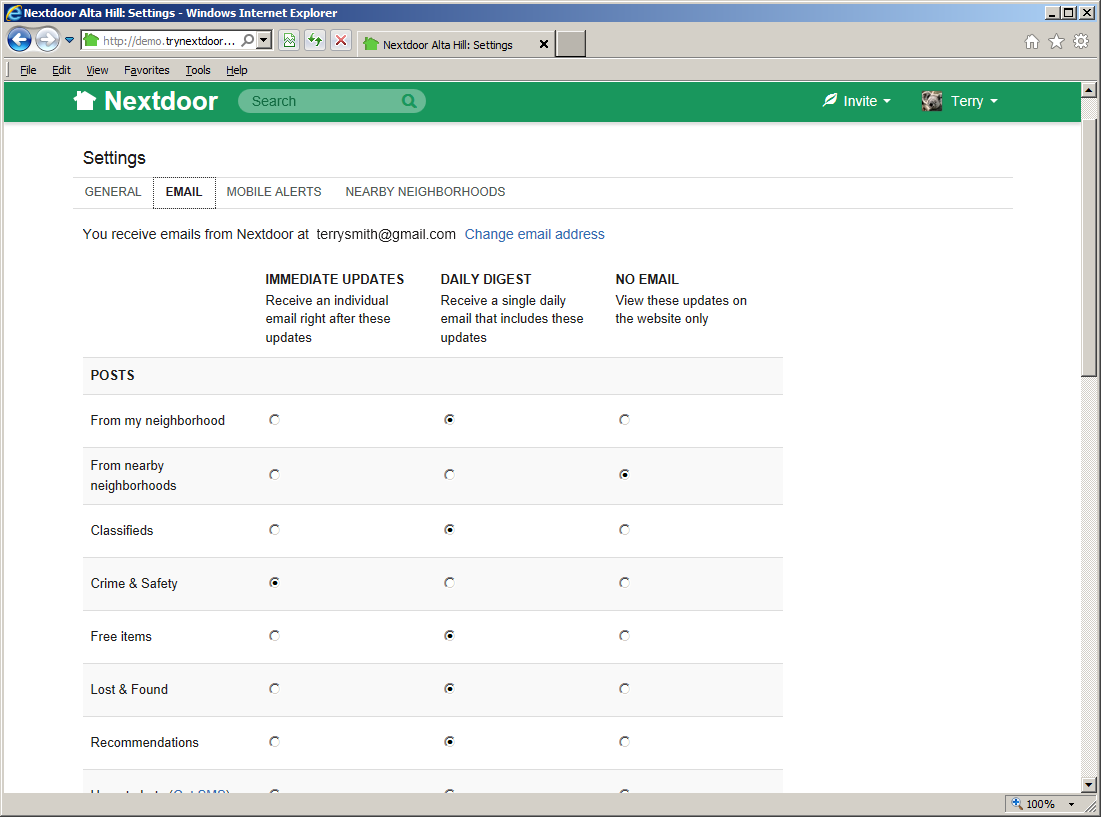
Look for You receive emails from Nextdoor at your email address near the top of the EMAIL settings page to see the email address that Nextdoor uses to send you messages.
To tell Nextdoor to use a different email address:
Click the Change email address link. The ACCOUNT settings page will come into view.
See Section 7.2.4, “Account Settings” for help to change your email address.
The EMAIL settings page also lets you control if and when you receive emails from Nextdoor as new information is added to the website.
For most of the categories below, you can select:
IMMEDIATE UPDATES: Nextdoor will send you an email immediately for each new message in this category.
DAILY DIGEST: Nextdoor will send you one email a day that includes all new messages in this category.
NO EMAIL: Nextdoor will not send you emails about new messages in this category. To view information in this category, you must view the Nextdoor website.
For some categories, you can only turn emails on or off.
The categories are:
POSTS:
From my neighbohood: If you want Nextdoor to send you an email when a resident of your neighborhood posts a public message, click IMMEDIATE UPDATES or DAILY DIGEST. If you do not want Nextdoor to send you emails for this category, select NO EMAIL.
From nearby neighborhoods: If you want Nextdoor to send you an email when a Nearby Neighborhood resident posts a public message, click IMMEDIATE UPDATES or DAILY DIGEST. If you do not want Nextdoor to send you emails for this category, select NO EMAIL.
Classifieds: If you want Nextdoor to send you an email when a neighbor posts a new message in the Classifieds category, click IMMEDIATE UPDATES or DAILY DIGEST. If you do not want Nextdoor to send you emails for this category, select NO EMAIL.
Crime & Safety: If you want Nextdoor to send you an email when a neighbor posts a new message in the Crime & Safety category, click IMMEDIATE UPDATES or DAILY DIGEST. If you do not want Nextdoor to send you emails for this category, select NO EMAIL.
Free items: If you want Nextdoor to send you an email when a neighbor posts a new message in the Free Items category, click IMMEDIATE UPDATES or DAILY DIGEST. If you do not want Nextdoor to send you emails for this category, select NO EMAIL.
Lost & Found: If you want Nextdoor to send you an email when a neighbor posts a new message in the Lost & Found category, click IMMEDIATE UPDATES or DAILY DIGEST. If you do not want Nextdoor to send you emails for this category, select NO EMAIL.
Recommendations: If you want Nextdoor to send you an email when when a neighbor posts a new message in the Recommendations category, click IMMEDIATE UPDATES or DAILY DIGEST. If you do not want Nextdoor to send you emails for this category, select NO EMAIL.
Urgent Alerts: If you want Nextdoor to send you an email when a neighbor posts an Urgent Alert, click IMMEDIATE UPDATES or DAILY DIGEST. If you do not want Nextdoor to send you emails for this category, select NO EMAIL.
Note
If you want Nextdoor to send urgent alert messages to your cell phone, click the Get SMS link. For help with alerts, see Section 7.2.2, “Mobile Alerts Settings”.
Welcome posts: If you want Nextdoor to send you an email when a neighbor welcomes you, click the Send me notifications when someone welcomes me box.
MEMBERS:
: If you want Nextdoor to send you an email when neighbors join Nextdoor, click the Send me twice-weekly announcements box.
Member changes: If you want Nextdoor to send you an email when new neighbors join or when neighbors deactivate their Nextdoor accounts, click the Notify me when new unverified neighbors join or existing neighbors deactivate their account box.
REPLIES/THANKS:
New replies from my neighborhood: If you want Nextdoor to send you an email when a Nextdoor member in your neighborhood replies to a public message, click IMMEDIATE UPDATES or DAILY DIGEST. If you do not want Nextdoor to send you emails for this category, select NO EMAIL.
New replies from nearby neighborhoods: If you want Nextdoor to send you an email when a Nearby Neighborhood resident replies to a public message, click IMMEDIATE UPDATES or DAILY DIGEST. If you do not want Nextdoor to send you emails for this category, select NO EMAIL.
Replies to my activity: If you want Nextdoor to send you an email when a neighbor replies to a message you posted (or to a message you clicked the button on), click the Email me replies to my posts or on a post I replied to or thanked box.
Thanks to my activity: If you want Nextdoor to send you an email when a neighbor clicks the button on a message you posted, click the Email me "Thanks" to my posts box.
EVENTS:
Invitations to events: If you want Nextdoor to send you an email when a neighbor posts an event, click IMMEDIATE UPDATES or DAILY DIGEST. If you do not want Nextdoor to send you emails for this category, select NO EMAIL.
RSVPs to my event: If you want Nextdoor to send you an email when a neighbor accepts the invitation to your event, click IMMEDIATE UPDATES or DAILY DIGEST. If you do not want Nextdoor to send you emails for this category, select NO EMAIL.
CITY UPDATES: You will see this section if your city is a member of the Nextdoor City Program (a link to information from your city officials, police department, and/or fire department):
Posts from city staff: If you want Nextdoor to send you an email when a city staff member posts a message, click IMMEDIATE UPDATES or DAILY DIGEST. If you do not want Nextdoor to send you emails for this category, select NO EMAIL.
Replies to city posts: If you want Nextdoor to send you an email when a city staff member replies to a city post you replied to or thanked, click Email me replies to city posts I've replied or thanked.
Urgent alerts from city staff: If you want Nextdoor to send you an email when a city staff member posts an urgent alert, click IMMEDIATE UPDATES or DAILY DIGEST. If you do not want Nextdoor to send you emails for this category, select NO EMAIL.
OTHER:
Nextdoor updates: If you want Nextdoor to send you general information about Nextdoor, click the Send me occasional updates box.
You can use the MOBILE ALERTS settings page to tell Nextdoor if you want to receive urgent alerts on your mobile (cell) phone:

You and your neighbors can use urgent alerts to tell each other immediately about important crime and safety issues, such as:
suspicious activity
missing children
fires, floods, or other disasters
local evacuations
Nextdoor can send urgent alerts to you by email. But you will usually receive alerts faster if you tell Nextdoor to send them to your cell phone.
The MOBILE ALERTS settings page shows if you receive alerts on your cell phone:
If Nextdoor does not know your cell phone number, you will see the message
Add your mobile phone number to receive urgent alerts from your neighborhood via text message (SMS).If Nextdoor knows your cell phone number and you receive mobile alerts, you will see the message
You're receiving urgent alerts via text message (SMS)on the STATUS line.Note
If your city is a member of the Nextdoor City Program (a link to information from your city officials, police department, and/or fire department), you will see a Send me urgent alerts from city staff box. Check this box if you want to receive urgent text messages from city staff members.
You will see your cell phone number on the MOBILE NUMBER line.
If Nextdoor cannot be sure that your cell phone number is correct, you will see the message
You're not receiving urgent alerts. Please confirm your number.
If you want to receive mobile alerts:
Click the green button. An “Add mobile phone number” form will come into view.
Type your 10-digit mobile (cell phone) number in the MOBILE PHONE NUMBER box.
Note
Be sure to include the area code. It is not necessary to type
+1before your phone number.Click the down-arrow button at the right side of the Select carrier box. On the list that drops down, click the name of your cell phone carrier (Verizon, AT&T, Sprint, T-Mobile, etc.).
Nextdoor must send a text message to your phone to make sure you typed the correct number. Click the green button to tell Nextdoor to send this text message.
Note
If you do not want to receive mobile alerts, click the button.
The “Add mobile phone number” form will change. It will show a CONFIRMATION CODE box:

When you receive the message from Nextdoor on your cell phone, type the confirmation code from the message in the CONFIRMATION CODE box on the website.
Click the green button.
You will see the message
You're receiving urgent alerts via text message (SMS)on the STATUS line. You will see your cell phone number on the MOBILE NUMBER line.
If your cell phone number changes or you want to stop the mobile alerts, you can change your mobile alerts settings:
To tell Nextdoor your new cell phone number, click the Change link below your old cell phone number. Then use the procedure in Section 7.2.2.1, “How to Receive Mobile Alerts” to set up your new phone number.
To tell Nextdoor to not send alerts to your cell phone, click the button. The message
Add your mobile phone number to receive urgent alerts from your neighborhood via text message (SMS)will come into view.
Note
For more information about Nearby Neighborhoods, see Chapter 6, Nearby Neighborhoods.
You can use the NEARBY NEIGHBORHOODS settings page to:
tell Nextdoor which Nearby Neighborhoods you want to see messages from.
tell Nextdoor if and when to send you emails when Nearby Neighborhood residents post messages.
control how much of your profile information Nearby Neighborhood residents see if you share public messages with them or reply to a message shared with them
Note
If you do not share messages with Nearby Neighborhoods or reply to shared messages, residents in those neighborhoods will not see your information at all.

The NEARBY NEIGHBORHOOD LIST section shows how many Nearby Neighborhoods you have turned on (0 or more). You will only see messages from Nearby Neighborhoods that you turn on. If you post a public message on Nextdoor and share the message with Nearby Neighborhoods, it will only go to Nearby Neighborhoods that you turned on.
To change which Nearby Neighborhoods are turned on:
Click the Personalize your list of nearby neighborhoods link. A map of your neighborhood and its Nearby Neighborhoods will come into view. You will see a list of Nearby Neighborhoods at the right side of the map.
Use the ON/OFF button to the right of a Nearby Neighborhood's name to change the setting for that neighborhood. If a neighborhood's button is set to
OFF, you can click and drag the button to theONposition to turn on that neighborhood. If a neighborhood's button is set toON, you can click and drag the button to theOFFposition turn off that neighborhood.
After you view or change your Nearby Neighborhood settings, you can go back to the home page or go back to the “Settings” page.
The EMAIL FROM NEARBY NEIGHBORHOODS section let you tell Nextdoor if and when to send you emails if Nearby Neighborhood residents post messages:
If you want Nextdoor to send you an email when a Nearby Neighborhood resident posts a public message, click Immediately or Once a day in a digest.
Note
If you click Once a day in a digest, Nextdoor will send you one email a day that includes all new messages in this category.
If you do not want to receive emails when Nearby Neighborhood residents post messages, click Never.
If you want Nextdoor to send you an email when a Nearby Neighborhood resident replies to a public message, click Immediately or Once a day in a digest.
If you do not want to receive emails when Nearby Neighborhood residents reply to messages, click Never.
The YOUR PROFILE section lets you control how much of your profile information Nearby Neighborhood residents see if you post public messages.
Note
If you do not post public messages to Nearby Neighborhoods, residents in those neighborhoods will not see your information at all.
If PROFILE SHARING is set to
OFF, residents in Nearby Neighborhoods will see only your name, your profile photo (if you have one), and your neighborhood's name. If PROFILE SHARING is set toON, residents in Nearby Neighborhoods will see your full profile.To see how your profile looks to residents in Nearby Neighborhoods, click the View my profile as a nearby neighbor link. A new window will open in your web browser to show your profile.
To change how your profile looks to residents in Nearby Neighborhoods, click and drag the PROFILE SHARING button. For example, if PROFILE SHARING is set to
ON, Nearby Neighborhoods will see your full profile. But if you want Nearby Neighborhoods to see only your name, photo, and neighborhood name, click and drag the button to theOFFposition.
You can use the ACCOUNT settings page to:
change the email address that Nextdoor uses to send you messages,
change your password,
change your street address, or
deactivate your Nextdoor account.

To tell Nextdoor that your email address has changed:
Type your new email address in the EMAIL ADDRESS box.
Click the button.
To change your Nextdoor password:
Click the link. A Change Password page will come into view.
Click in the Current password box. Type your password (the password you used to sign in to Nextdoor).
Click in the New password box. Type your new password.
Click in the Confirm new password box. Type your new password again.
Note
Nextdoor does not show the password you typed. Nexdoor tells you to type your password two times to be sure that you know your new password.
If the message
The two password fields didn't matchcomes into view, start again at the second step.Click the button.
Note
If you do not want to change your password, click the button.
The Nextdoor “home” page will come into view.
To tell Nextdoor that your street address has changed:
Caution
If you change your street address, you must confirm your new address.
If the new address is in the boundary of a different Nextdoor neighborhood:
You can no longer use your old neighborhood's Nextdoor site.
The members of your old neighborhood's Nextdoor site:
will continue to see the messages you posted there.
will not see your new address.
will see only your name (not your full profile) if they click your name or picture on a message you posted.
Until you confirm your new address, you cannot use the Nextdoor website for your new neighborhood.
Click the Change address link. A Settings: Change Address page will come into view.
In the “NEW ADDRESS” section, type your new street address, apartment/suite (if applicable), city, state, and ZIP code.
Click the green button.
Note
If you do not want to change your street address, click the button.
Confirm your new address. For help with this, see Chapter 2, How to Join Nextdoor, Section 2.2.3, “Confirm Your Address”.
To deactivate (remove) your Nextdoor account:
Caution
If you deactivate your account, you can no longer use Nextdoor.
The members of your neighborhood's Nextdoor site:
will continue to see the messages you posted there.
will see only your name (not your full profile) if they click your name or picture on a message you posted.
Click the Deactivate account link. A page will come into view.
Click the down-button symbol at the right side of the box.
On the list that drops down, click a reason, such as
Moved or moving,Didn't find it useful,Privacy concerns,Received too much email,Duplicate account,Too many negative posts,Not enough neighbors, orOther reasons.Nextdoor will possibly show some some information that can help you. For example, if you click
Moved or moving, Nextdoor will show the message,If you are moving, deactivation is actually the wrong way to remove yourself from your neighborhood. Change your address instead.If this information applies to you, you can click the link in the message to do something other than deactivate your account. For example, the message that Nextdoor shows when you click
Moved or movingincludes a link to Change your address.
If you want to give Nextdoor more information about your decision to deactivate your account or how to make Nextdoor better, type that in the How can we improve Nextdoor? box.
If you want the lead member(s) of your Nextdoor site to see the information you typed in the How can we improve Nextdoor? box, click the Share this feedback with your neighborhood Lead(s).
Click the green button.
Note
If you want to join Nextdoor again after you deactivate your account, you can reactivate your account:
Sign in to Nextdoor with the same email address and password that you used before.
Click the button.
You can use the Nextdoor website to:
read and post public messages
read and send urgent messages
read and send private messages
read and post messages in your groups
search for public and group messages
Note
For more information on groups, see Chapter 9, Groups.
“mute” (turn off) messages from specified neighbors
If you tell Nextdoor to send you emails about messages posted on Nextdoor, you can read and reply to messages by email.
The right side of the home page shows public messages and messages posted to your groups.
If one or more Nearby Neighborhoods are turned on, you will see messages from your neighborhood and from Nearby Neighborhoods. (For help with Nearby Neighborhoods settings, see Section 7.2.3, “Nearby Neighborhoods Settings”.) If you want to see only messages from your neighborhood's residents, click the your neighborhood's name link in the “LOCAL” section. To see messages from Nearby Neighborhoods, click the Nearby Neighborhoods link. To see messages from your neighborhood and Nearby Neighborhoods again, click the Home link near the top left corner of the page.
Note
You can also click the your neighborhood's name tab below the “Post a message, event, or urgent alert to neighbors” box to see messages only from your neighborhood. You can click the your neighborhood's name + # Nearby Neighborhoods tab to see messages from your neighborhood and Nearby Neighborhoods.
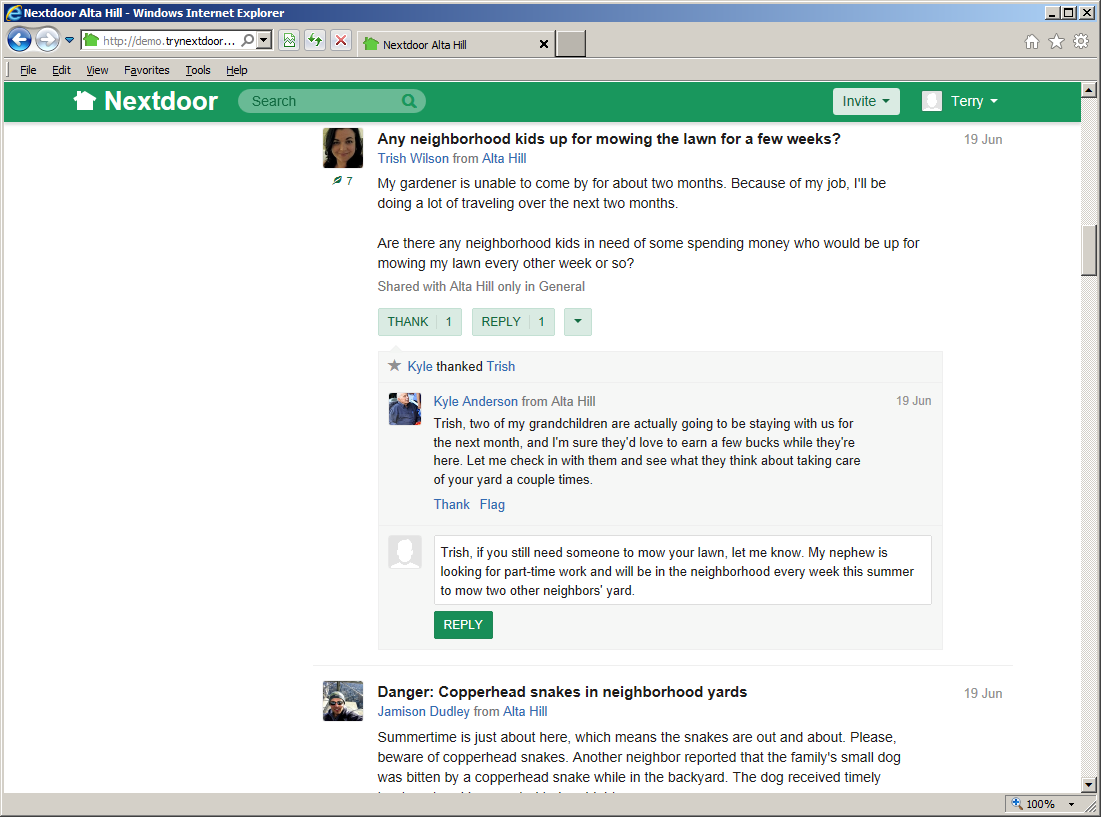
Nextdoor shows the first three or four lines of each message. If a message is longer than that, you can click the View more link at the bottom of the message to read the full message. Or, you can click the subject (description) at the top of the message to see the full message on a new page. Nextdoor shows the three newest replies to each public message. If there are more replies, you can click the View all # replies link to see all replies.
The list of messages is too long to fit on one screen. Use your mouse to scroll down to read more messages.
If you want to read messages from only a specified category, click the name of that category at the left side of the page.
The message categories are:
Classifieds: Click this link to see messages about items that neighbors want to sell or buy.
Crime & Safety: Click this link to see messages about crime and safety.
Documents: Click this link to see a list of files that neighbors share with other neighbors.
Files can be in different formats, for example:
Picture or photo files can have names that end with
.GIF,.JPG,.JPEG, or.PNG.Portable Document Format files have names that end with
.PDF. You can open PDF files with software such as Adobe Reader.Microsoft Word format files have names that end with
.DOCor.DOCX. You can open these files with Microsoft Word.Microsoft Excel format files have names that end with
.XLSor.XLSX. You can open these files with Microsoft Excel.
To open files in the Documents section, you must have the necessary software installed on your computer. For example, to open a PDF file, you must have Adobe Reader (or some other software that can open PDF files) installed on your computer. To open a Microsoft Word document, you must have Microsoft Word (or some other software that can open Word files) installed on your computer.
Free items: Click this link to see messages about items that neighbors want to give away for free.
General: Click this link to see messages that do not fit into some other category.
Lost & Found: Click this link to see messages about lost or found pets or items.
Recommendations: Click this link to see messages about companies or services neighbors used, and if the neighbors recommend those companies or services
Caution
When you click the or button below a message, neighbors who can see the initial message can see your name. If you reply to a public message, neighbors who can see the initial message can also see your message.
If residents of Nearby Neighborhoods can see the initial message, they can see your name/message. They can also see some or all of your profile information.
For more information about Nearby Neighborhoods, see Chapter 6, Nearby Neighborhoods. For help with your Nearby Neighborhood settings, see Section 7.2.3, “Nearby Neighborhoods Settings”.
If you agree with a message or think the information in the message is good, you can click the green button below the message.
Note
If there is no button below the message, click the word Thank at the bottom of the message.
You will see the message You thanked below the message. The name of the button or link will change to .neighbor's name
Note
If one or more neighbors click the button below a message, you will see a number at the right side of the button. For example, you will see if three neighbors clicked the button.
Note
If you clicked the button or link by accident (and its name changed to ), you can click the button or link again. The number on the button will decrease by 1, and Nextdoor will remove the You thanked message.neighbor's name
If you click the button or link, you do not need to reply to the message. But you can reply if you want to.
To reply to a public message:
Click the green button below the message.
Note
If one or more neighbors reply to the message before you do, you will see a number at the right side of the button. For example, you will see if two neighbors replied to the message.
An empty box will come into view below the message. Type your message into the empty box.
Click the green button below the message you typed:
You can move messages to different categories to help neighbors find information more easily. For example, if a neighbor posts a message about a lost pet in the “General” category, you can move the message to the “Lost & Found” category.
To change a message's category:
Click the down-arrow symbol below the message.
On the menu that drops down, click Change category. A “Choose category for this post” form will come into view.
Click the best category for the message:
Classifieds: Click this box if the message is about an item that a neighbor wants to sell or buy.
Crime & Safety: Click this box if the message is about a crime or safety subject.
Free items: Click this box if the message is about an item that a neighbor wants to give away for free.
General: Click this box if the message does not fit into some other category.
Lost & Found: Click this box if the message is about a lost or found pet or item.
Recommendations: Click this box if this message is about a company or service a neighbor used.
If you click Recommendations, you can scroll down the list and check one or more items to give more information about the company or service.
The primary categories for recommendations include Automotive, Classes and lessons, Family and parenting, Food and entertainment, Home and garden, Medical and dental, Other services and businesses, Personal care, Pet services, Professional services, and Wellness. Each of these categories includes many sub-categories. You can check one or more sub-categories.
For example, on a message about a veterinarian that also does dog grooming and supplies kennel services:
you could scroll down to the Pet services category, then
you could check the Dog grooming, Kennel, and Veterinarian sub-categories.
To save your changes, click the green button.
Note
To cancel your changes, click the pale green button.
If you see a public message that contains bad language, advertising, or other inappropriate information, you can “flag” the message. This tells the lead user(s) for your neighborhood that the message must be reviewed and possibly deleted.
To flag a message:
Click the down-arrow symbol below the message.
On the menu that drops down, click .
Note
If there is no down-arrow symbol below the message, click the word Flag at the bottom of the message.
A “Flag this post for review” form will come into view.
Click a reason:
Inappropriate
Abusive
Commercial
Posted in error
To flag the message, click the green button.
Note
To not flag the message, click the pale green button.
If you click the down-arrow symbol below the message again, you will see that the word has changed to .
To post a new public message:
Click in the Post a message, event or urgent alert to neighbors box near the top of the home page. A MESSAGE form will come into view:
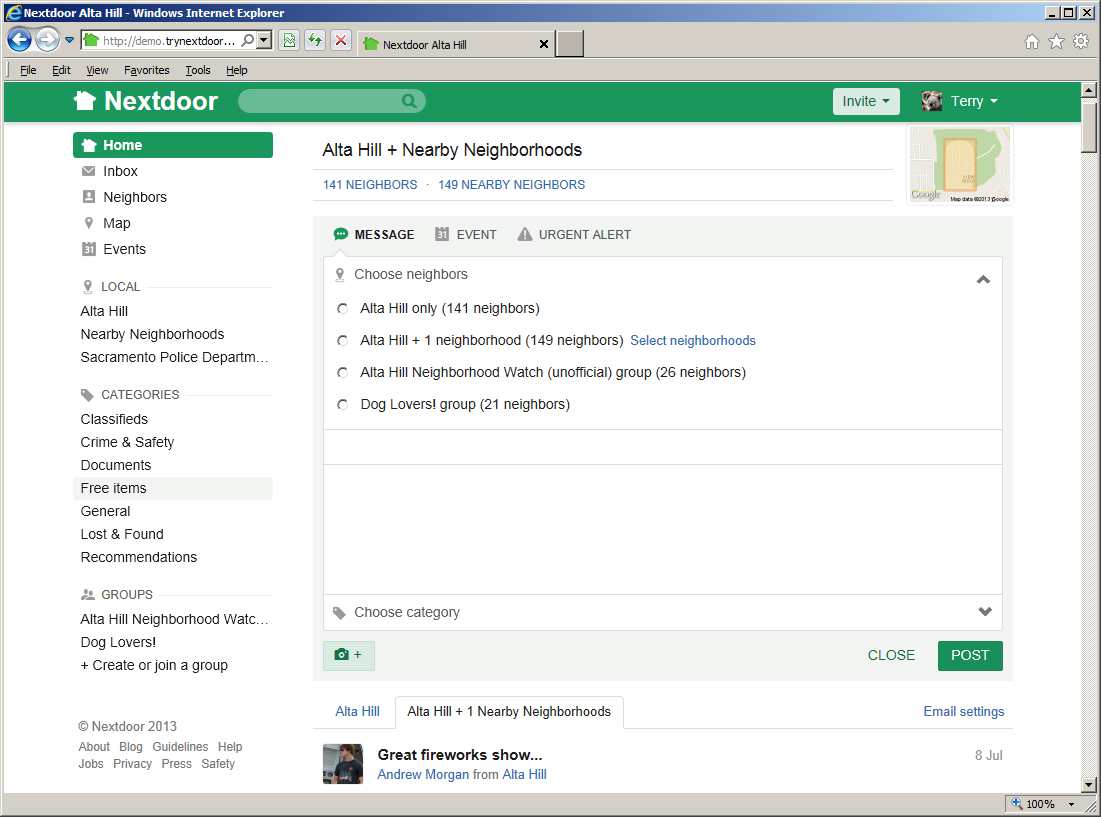
Use the Choose Neighbors section to tell Nextdoor who can see your message:
your neighborhood's nameonly: Click this if you want only your neighborhood's residents to see your message.your neighborhood's name+ # neighborhoods: Click this if you want Nearby Neighborhood residents to see your message.Note
If no Nearby Neighborhoods are turned on, you will not see this.
If you want only residents in some Nearby Neighborhoods to see your message, click the Select neighborhoods link. A list of Nearby Neighborhoods that are turned on will come into view. You will see a small box to the left of each Nearby Neighborhood's name. If you do not want residents in a specified Nearby Neighborhood to see your message, click the box to the left of that neighborhood's name. Then click the green button.
the names of your groups: If you are a member of one or more groups, you will see the groups' names on the list. Click a group name if you want only members of that group to see your message.
Click in the Add subject box. Type a short description of your message.
Click in the Write message box. Type your message.
Click in the Choose category box. A list of categories will come into view: Classifieds, Crime & Safety, Free items, Lost & Found, Recommendations, and General. Click the category that best agrees with your message.
If you click Recommendations, you will see a “Please select a category for your recommendation” form come into view:
Click in the “Select or search for a category (e.g., dry cleaner)” box.
Type a category name for the recommendation (such as
daycareorplumber). As you type, a list of categories will drop down. (For example, if you typecare, you will see categories that containcare, such as “Daycare” and “Eldercare,” on the list that drops down.)When you see the name of the appropriate category, click it.
Click the green button.
To add a photo to your message:
Click the “camera” button below the box. A dialog box from your computer will come into view.
Use the dialog box to find the directory or folder on your computer that contains the photo file.
When you find the file, select it.
The home page will come back into view.
To post your message, click the green button.
Note
To cancel the message, click the button.
If one or more Nearby Neighborhoods are included, a “Confirm your post to
#neighbors form” will come into view. The form shows the message,Your post will be seen by # neighbors inyour neighborhood's name+ # nearby neighborhoods. Please note these guidelines when posting to nearby neighborhoods: Content should be relevant and useful for all neighborhoods. Self-promotional messages and advertising are not permitted. Your name and photo will be visible to your nearby neighbors. If you wish to reduce the number of neighborhoods who will receive this post, please click REVISE below.Note
Unless you turn this message off, you will see it each time you share a message with Nearby Neighborhoods. To turn the message off, click the Don't show this message again box before you click the button.
If you want to make changes to your message, click the pale green button. You can then change the message, and click the button again.
If you want to share the message with the Nearby Neighborhood(s), click the green button.
You can attach files (such as photos) to all new messages that you post. But you can add files that are more important than others to the “Documents” category. Files in the “Documents” category are easy to find and refer to.
Note
Only members of your own neighborhood can see messages and files in the “Documents” category.
Files can be in different formats, for example:
Picture or photo files can have names that end with
.GIF,.JPG,.JPEG, or.PNG.Portable Document Format files have names that end with
.PDF. You can open PDF files with software such as Adobe Reader.Microsoft Word format files have names that end with
.DOCor.DOCX. You can open these files with Microsoft Word.Microsoft Excel format files have names that end with
.XLSor.XLSX. You can open these files with Microsoft Excel.
To add a file to the “Documents” category:
On the home page, click the Documents link in the “CATEGORIES” section at the left side of the page. A “Documents” page will come into view:
Click the green button near the top right corner of the page.
Click in the Add subject box. Type a short description of the document.
Click in the Describe the document you wish to share box. Type a message about the document.
To attach the document to your message:
Click the “camera” button below the Describe the document you wish to share box. A dialog box from your computer will come into view.
Use the dialog box to find the directory or folder on your computer that contains the document file.
When you find the file, select it.
The “Documents” page will come back into view.
To post your message and the document, click the green button.
Note
To cancel the message, click the button.
To see a document:
On the home page, click the Documents link in the “CATEGORIES” section at the left side of the page. A “Documents” page will come into view.
Click the subject (description) of the document you want to see. (For example, to see the document about NERT training, click NERT Training.) A page with the message will come into view. At the bottom of the message, you will see a “paperclip” icon with a link to its right.
Click the link to the right of the “paperclip” icon to open the document. If you have the necessary software installed on your computer, the document will come into view.
To go back to the Nextdoor website, click the “back” button in your web browser.
When you post a public message, you can make changes to that message for up to 30 days. You can also delete messages you posted.
To change a public message that you posted:
Find the message that you want to change.
Click the down-arrow symbol below the message.
On the menu that drops down, click .
Note
If there is no down-arrow symbol below the message, click the word Edit at the bottom of the message.
Note
If the message is more than 30 days old, Edit will not be on the menu or at the bottom of the message. You cannot change messages that are more than 30 days old.
Type the changes to your message.
Click the green button.
Note
To not change the message, click the pale green button.
The phrase Edited just now will come into view below the message to show that you changed it.
Note
Nextdoor members can select to receive public messages by email. If you change a message more than two minutes after you post it, the Nextdoor website will show your changes. But some members will possibly receive a copy of the first version of the message (without your changes) by email.
To delete a public message that you posted:
Find the message that you want to delete.
Click the down-arrow symbol below the message.
On the menu that drops down, click .
Note
If there is no down-arrow symbol below the message, click the word Delete at the bottom of the message.
A “Delete this post?” (or “Delete this reply?”) form will come into view.
To delete the message, click the green button.
Note
To not delete the message, click the pale green button.
Note
If you delete a message less than two minutes after you post it, the message will not be sent to other Nextdoor members.
If you delete a message more than two minutes after you post it, it will be removed from the Nextdoor website. But some members will possibly receive a copy of the message by email.
You and your neighbors can use urgent alerts to tell each other immediately about important crime and safety issues, such as:
suspicious activity
missing children
fires, floods, or other disasters
local evacuations
Nextdoor sends urgent alerts by email, or by cell phone for members who tell Nextdoor they want to receive mobile alerts. For help with mobile alerts, see Section 7.2.2, “Mobile Alerts Settings”.
Caution
Only send urgent alerts for crime or safety issues that your neighbors must know about immediately. If applicable, call 911 before you send an urgent alert.
To send an urgent alert:
Click in the Post a message, event or urgent alert to neighbors box near the top of the home page. A MESSAGE field will come into view:
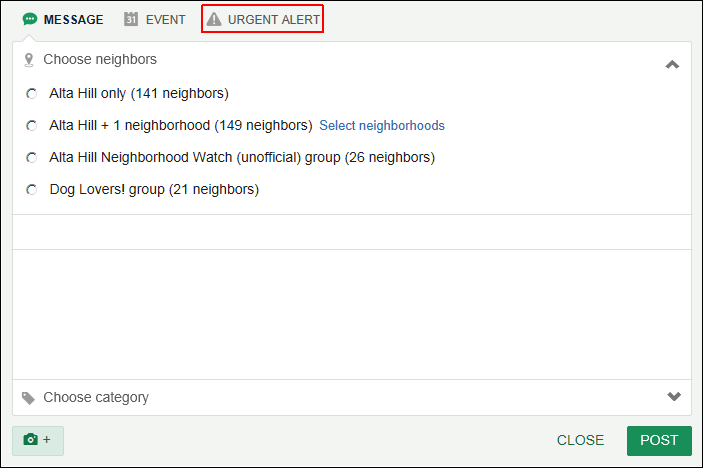
Click URGENT ALERT at the top of the MESSAGE field. A “Send an urgent alert” form will come into view:

Type a short message in the Write an urgent message to your neighbors box. The message can be no more than 110 characters long. (Nextdoor will not let you send the message if it is more than 110 characters long.)
Click the green button. A new form that shows your message will come into view.
If you want to send the urgent alert, click the green button.
Note
To cancel the message, click the button. The “Send an urgent alert” form will come back into view. Click the at the top right corner of this form to cancel the message.
To add more information, you can reply to an urgent alert.
Note
If you reply to an urgent alert, Nextdoor will not send the information you add as an urgent alert.
If you reply to a public message, neighbors who can see the initial message will see the information you type. But you can send a private message to a neighbor.
To send a private message:
If the neighbor posted a public message, you can click the neighbor's name or photo on that public message.
Note
You will see the neighbor's name below the subject of the message. If the neighbor has a profile photo, you will see their photo to the left of the message's subject. If the neighbor does not have a profile photo, you will see a standard picture of a “female” or “male” head.
The neighbor's profile page will come into view. Click the pale green button near the top of the profile page.
You can use the “Neighbors” page to find a neighbor in your neighborhood.
To see the “Neighbors” page, click the Neighbors link at the left side of the home page.
Scroll down the page until you see the neighbor you want to send a message to.
Click the pale green button to the right of the neighbor's name.
Note
For more help with the “Neighbors” page, see Chapter 10, How to Find a Neighbor on Nextdoor.
A “Send a message to
neighbor's name” form will come into view:
Click in the Enter a subject box. Type a short description for your message.
Click in the Enter a message box. Type your message.
If you want Nextdoor to send you a copy of this message by email, click the Email me a copy of this message box.
To send the message, click the green button.
Note
To cancel the message, click the pale green button.
To read private messages:
Click the Inbox link at the left side of the home page.
Note
If your Inbox contains messages you have not read, you will see a number to the right of Inbox. For example, if you see the number
2to the right of Inbox, you have two new messages.An “Inbox” page will come into view. Messages that you have read will have a gray background. New messages will have a white background.
Note
Your Inbox shows only the 100 newest messages.
To see a full message, click the subject (description) of the message.
If you want, you can move messages you have read out of your Inbox to the “Archive” area. This lets you keep your Inbox clean.
To move a message from your Inbox to the Archive:
Click the Inbox link at the left side of the home page to view a list of messages in your Inbox.
Click the Archive link at the right side of the message that you want to move. The message will be immediately moved.
To view archived messages:
Click the Inbox link at the left side of the home page to view a list of messages in your Inbox.
Click the View Archive link near the top right corner of the page. An “Archive” page will come into view.
To move an archived message back to the Inbox, click the Move to Inbox link at the right side of the message.
The list of messages on the home page is very long. To find a message that a neighbor posted more than a week or two ago, you can scroll far down the home page. As an alternative, you can look at messages in a specified category or group. You can also search for messages.
To look at messages in a specified category or group, click the category or group's link at the left side of the home page:
Classifieds: Click this link to see messages about items that neighbors want to sell or buy.
Crime & Safety: Click this link to see messages about crime and safety.
Documents: Click this link to see a list of files that neighbors share with other neighbors.
Files can be in different formats, for example:
Picture or photo files can have names that end with
.GIF,.JPG,.JPEG, or.PNG.Portable Document Format files have names that end with
.PDF. You can open PDF files with software such as Adobe Reader.Microsoft Word format files have names that end with
.DOCor.DOCX. You can open these files with Microsoft Word.Microsoft Excel format files have names that end with
.XLSor.XLSX. You can open these files with Microsoft Excel.
Free items: Click this link to see messages about items that neighbors want to give away for free.
General: Click this link to see messages that do not fit into some other category.
Lost & Found: Click this link to see messages about lost or found pets or items.
Recommendations: Click this link to see messages about companies or services neighbors used, and if the neighbors recommend those companies or services.
The “GROUPS” section shows links to the public and private groups of which you are a member. Click a group's name to see messages in that group.
To search for messages that contain one or more specified words:
Click in the Search box near the top left corner of the page:

Type one or more words:
If you type one word, Nextdoor will find messages that contain that word.
If you type more than one word, Nextdoor will find messages that contain all the words you typed. For example, if you type
dog cat, Nextdoor will find messages that include the worddogand the wordcat.If you type a minus sign (
-) in front of a word, Nextdoor will find messages that do not contain that word. For example, if you typedog -cat, Nextdoor will find message that include the worddogbut not the wordcat.
Press <Enter> on the keyboard or click the “magnifiying glass” symbol at the right side of the Search box. A “Search results for '
your word(s)'” page will come into view:
The “Search results for '
your word(s)'” page shows a list of messages and events that contain your word or words. To see a full message, click the subject (description) of the message. For example, to see the full message about the dog park, click Dog Park Update.
Most neighbors post good information on Nextdoor. But possibly some neighbors will post messages that you do not agree with, or messages that contain incorrect information. If you do not want to see messages from a specified neighbor, Nextdoor lets you “mute” (turn off messages from) that neighbor.
Note
The neighbor will not know that you muted him or her.
If you mute a neighbor:
You will not see messages posted by that neighbor on the Nextdoor website.
You will see the message
This comment has been mutedon the website if that neighbor replies to a message.You will not receive emails from Nextdoor when that neighbor posts or replies to messages.
You will receive private messages that the neighbor sends to you.
You will receive urgent alerts sent by that neighbor, to make sure that you know about emergencies.
To mute a neighbor:
Look at the neighbor's profile page:
If the neighbor posted a public message, you can click the neighbor's name or photo on that public message.
Note
You will see the neighbor's name below the subject (description) of the message. If the neighbor has a profile photo, you will see their photo to the left of the message's subject. If the neighbor does not have a profile photo, you will see a standard picture of a “female” or “male” head.
You can use the “Neighbors” page to find a neighbor in your neighborhood.
To see the “Neighbors” page, click the Neighbors link at the left side of the home page.
Scroll down the page until you see the neighbor you want to send a message to.
Click the neighbor's name or photo.
Note
For more help with the “Neighbors” page, see Chapter 10, How to Find a Neighbor on Nextdoor.
The neighbor's profile page will come into view.
Click the pale green button near the top of the profile page. A “Mute neighbor's name?” form will come into view.
If you want to mute this neighbor, click the red button.
Note
To not mute the neighbor, click the pale green button.
The neighbor's profile page will come back into view. You will see the message
You've mutedat the top of the page. The name of the button will change to .neighbor's nameNote
After you mute a neighbor, you will see a small “speaker” icon (
 ) to the right of that neighbor's name on the “Neighbors” page.
You can un-mute a neighbor (turn on their messages again) if you want. To un-mute a neighbor, do the above procedure again and click the button.
A group is an area of Nextdoor where neighbors can share messages about a specified subject. Only members of the group can see messages posted in the group, or add new messages to the group. A group is a good location for messages that most neighbors do not want to read. For example, if you want to share messages about politics or sports, you can make a group for that subject.
A group can be public or private. When a neighbor makes a new group, that neighbor makes the group a public group or a private group. If the group is private, only the neighbors invited to join the group can be members. All neighborhood residents can join public groups.
Note
Residents of Nearby Neighborhoods cannot see public or private groups in your neighborhood.
To see a list of public groups and join a a group:
Click the Browse all
#groups link in the “GROUPS” section near the bottom left corner of the home page. A “Groups in ” page will come into view.Click the name of the group that you want to join. A page with more information about the group will come into view.
To join the group, click the green button.
After you join a group, you will see the name of the group in the “GROUPS” section.
You will not see private groups when you click the Browse all # groups link. To join a private group, you must be added to the group by the person who made the private group.
If you do not want to be a member in a group, you can leave the group.
To leave a group:
Click the group's name in the “GROUPS” section near the bottom left corner of the home page. The group's page will come into view.
Click the green button at the top right corner of the page. A list of items will drop down.
Click Leave group on the list that drops down. An “Are you sure you want to leave this group?” form will come into view.
If you are sure that you do not want to be a member of the group, click the green button. (If you want to stay in the group, click the pale green button.)
After you join a group, you will see messages from that group on the home page, along with public messages. To look at only messages from a group, click that group's name in the “GROUPS” section near the bottom left corner of the home page. The group's page will come into view.
You can use one of two procedures to start a new message in a group:
Do the procedure in Chapter 8, How to Read and Send Messages, Section 8.1.4, “How to Post Public Messages” to post a new message on the home page. In step #2, click the name of the group in the Choose Neighbors section. Then do steps #3 thru #7.
Click the name of the group in the “GROUPS” section on the home page. The group's home page will come into view. Click in the Post a message, event or urgent alert to neighbors box near the top of the group's page. Then do steps #3 thru #7 in Chapter 8, How to Read and Send Messages, Section 8.1.4, “How to Post Public Messages”.
To see a list of group members:
Click the group's name in the “GROUPS” section on the home page. The group's page will come into view.
Click the # MEMBER link near the top of the group's page, below the group's name. A list of the group's members will come into view.
To close the member list and see messages in the group, click the UPDATES link (to the left of the # MEMBER link).
If you want to share messages about a specified subject, and there is no group for that subject, you can make a new group. If you make a new group, you will be the “moderator” (manager) of the group.
As moderator, you can
delete messages from the group
add members to the group
delete members from the group
change the name and description of the group
delete the group, if it contains no messages or only messages that you posted
add other moderators to the group
To make a new group:
Click the Browse all
#groups link in the “GROUPS” section near the bottom left corner of the home page. A “Groups in ” page will come into view.Click the green button near the top right corner of the page. A “Create a new group” form will come into view.
Click in the NAME box. Type a short name for the new group. For example,
Game ExchangeorExercise Buddies.Click in the DESCRIPTION box. Type more information about the group. This will help neighbors know if they want to join the group. For example,
If you want to borrow or lend PS, Wii, or XBox games, this is the group for you!To make the group a private group, click Private.
Click the green button. A page for the new group will come into view.
Note
To not make the group, click the pale green button.
If the group is private, be sure to add some members to the group.
Note
If the group is public, neighbors can join the group if they want to.
To add a member to a private group:
Click the green button at the top right corner of the group's page.
On the menu that drops down, click Add members.
Click the Enter a neighbor's name to add them to the group box.
Type the name (or part of a name) of a neighbor you want to add to the group. As you type, a list of names will drop down. (For example, if you type
john, you will see names that containjohn, such as “Jim Johnson,” “John Smith,” or “Terry Johnston,” on the list that drops down.) When you see the name of the neighbor, click it.
As the moderator of the group, you can manage the group and its members. For example, you can delete messages from the group.
To delete a message from the group:
Click the down-arrow button below the message you want to delete. A list of items will drop down.
Click Delete on the list of items. A “Delete this post?” form will come into view.
To delete the message, click the green button.
Note
To not delete the message, click the pale green button.
At the top right corner of the group's page, you will see a green button. When you click the button, a list of items will drop down:
Add members: Click this item to add members to the group.
Note
If the group is private, only neighbors that you add to the group can be members. If the group is public, neighbors can join the group if they want. It is not necessary for you to add members to a public group.
Click the Enter a neighbor's name to add them to the group box. Type the name (or part of a name) of a neighbor you want to add to the group. As you type, a list of names will drop down. (For example, if you type
john, you will see names that containjohn, such as “Jim Johnson,” “John Smith,” or “Terry Johnston,” on the list that drops down.) When you see the name of the neighbor, click it.Leave group: Click this item if you no longer want to be a member of the group. An “Are you sure you want to leave this group?” form will come into view.
If you are sure that you do not want to be a member of the group, click the green button.
Caution
The group must have a moderator. If you are the only moderator, you cannot leave the group until you make some other member a moderator. (For help with the Make moderator function, see below.)
If the group contains no messages or only messages that you posted, you can delete the group. For help with the Delete group function, see below.
If you want to stay in the group, click the pale green button.
Edit group: Click this item to change the name or description of the group, or to add a photo to the group's page.
An “Edit group” form will come into view.
To change the group name or description, type the new information into the NAME or DESCRIPTION box.
To add a photo to the group:
Click the button. A dialog box from your computer will come into view.
Use the dialog box to find the directory or folder on your computer that contains the photo file.
When you find the file, select it.
To save your changes to the group, click the green button.
Note
To not save your changes to the group, click the pale green button.
Delete group: Click this item to delete the group.
Note
You can delete the group only if it contains no messages, or only messages that you posted.
If you delete the group, all messages in the group will be deleted.
A “Really delete
group name?” form will come into view. Click the green button to delete the group. To not delete the group, click the pale green button.
To the right of each group member's name, you will see a down-arrow button.
When you click the down-arrow button to the right of a member's name, a list of items will drop down:
Make moderator: Click this item to make this member a moderator of the group. An “Add
member nameas a moderator of this group?” form will come into view. To make the member a moderator, click the green button.Note
You will see the word MODERATOR to the right of that member's name on the group's member list.
To not make the member a moderator, click the pale green button.
Remove from group: Click this item to delete this member from the group. A “Remove
member namefrom group?” form will come into view.Nextdoor will send the neighbor a message to tell him or her that he or she is no longer a group member. If you want, you can also add a brief message. To do that, click in the Optional: include a brief explanation with the notification box and type a short message.
To delete the member from the group, click the green button. To not delete the member, click the pale green button.
If a neighbor posts a public message on Nextdoor, you will see that neighbor's name to the left of the message. (If the neighbor has a profile photo, you will also see their photo.)
Some neighbors do not post public messages, but you can use the “Neighbors” list to find them. To see the “Neighbors” list, click the Neighbors link near the top left corner of the home page:

Here are some important items to know about the “Neighbors” list:
The list only shows Nextdoor members in your neighborhood, not Nearby Neighborhoods.
The list only shows 20 names at a time. To see more names, scroll down the page.
The list is shown in sequence by neighbors' first names. (For example, you will see a name such as “Alan Zellner” before a name such as “Zoe Adams”.) But you can click the LAST NAME link at the top of the list to see it in sequence by neighbors' last names. (Then you will see “Zoe Adams” before “Alan Zellner.”)
To see the list in sequence by street names (or numbers) and house numbers, click the ADDRESS link at the top of the list.
Note
Neighbors who let Nextdoor show their full address (with house numbers) are at the top of the list. The list is shown in sequence by their street names (or numbers) and house numbers. Neighbors who do not let Nextdoor show their full address are at the bottom of the list.
If you do not let Nextdoor show your full address, you will be near the bottom of the list. To change your address settings, see Chapter 7, How to Change Your Nextdoor Settings, Section 7.1, “Your Profile”.
To see only neighbors who live on a specified street:
Click the button at the top of the list. A list of street numbers and names will drop down.
Click a street number or name on the list. You will see a list of neighbors who live on that street.
To see the list in sequence by when neighbors joined Nextdoor, click the NEWEST link at the top of the list.
To see a neighbor's profile, click the neighbor's name on the list. (For more information about profiles, see Chapter 7, How to Change Your Nextdoor Settings, Section 7.1, “Your Profile”.)
To send the neighbor a private message, click the pale green button to the right of the neighbor's name. (For help with private messages, see Section 8.3, “Private Messages”.)
To find out which neighbor lives at a specified address, you can use the neighborhood map. For help with the map, see Chapter 11, How to Use the Neighborhood Map.
To see a map of your neighborhood, click the Map link near the top left corner of the home page:

Note
Pictures in this manual are from the “Nextdoor Alta Hill” website. Nextdoor Alta Hill is an example website that Nextdoor made to use for tests and demonstrations. The information on Nextdoor Alta Hill is not real.
You will see your house at the middle of the map.
The map uses different colors to show which neighbors are Nextdoor members:
Addresses shown in green are where Nextdoor members live.
Addresses shown in red have no Nextdoor members.
Addresses shown in pale orange have no Nextdoor members but were sent an invitation to join Nextdoor.
You can use one of two procedures to move around on the map:
Click the symbols in the circle near the top left corner of the map. Click < to move left (west), > to move right (east), ^ to move up (north), or v to move down (south).
Click and drag the map from side to side, or up or down.
To make a section of the map smaller (to see more of the neighborhood), click the minus sign ( - ) at the left side of the map. To make a section of the map larger (to see less of the neighborhood), click the plus sign ( + ) at the left side of the map.
To see a “street view” of a specified address:
Click the yellow “person” icon at the left side of the map (above the
+sign) and drag it to an address. A “street view” of that approximate address will come into view.You can move around in the “street view” as you do on the map. (Click the symbols in the circle near the top left corner of the map, or click and drag on the map.) If you see white arrow symbols on a street, you can click an arrow to move the “street view” in the direction of the arrow.
To close the “street view” and go back to the map, click the white X at the top right corner of the “street view.”
You can use the map to see which Nextdoor member lives at an address, or to invite a neighbor to join Nextdoor.
To see which Nextdoor member lives at an address, click an address shown in green. A form that shows the member(s) at that address will come into view:

You can click the Send message link below a member's name to send them a private message. (For help with private messages, see Chapter 8, How to Read and Send Messages, Section 8.3, “Private Messages”.)
Note
To close the form that shows members at that address, click the X at the top right corner of the form.
You can also use the map to invite a neighbor to join Nextdoor:
Click an address on the map.
If you click a green address, a form that shows members at that address will come into view. If more neighbors live at that address, click the Missing someone? Invite them to join! link at the bottom of the form.
An “Invite a neighbor” form will come into view.
Click in the Email box. Type the neighbor's email address.
If you want to include a message for the neighbor, click in the Message (optional) box. Type a message.
To invite the neighbor, click the green button.
Note
If you do not want to invite the neighbor to join Nextdoor, click the button.
Nextdoor will send an invitation to the neighbor by email. If the neighbor accepts the invitation, you will get credit for the invitation.
Note
For more help with invitations, see Chapter 13, How to Invite Your Neighbors to Join Nextdoor.
To see a list of scheduled events, click the Events link near the top left corner of the home page.
Note
If there are events scheduled for the future, you will see a number to the left of Events. For example, if you see the number 2 to the left of Events, there are two events scheduled.
The “Events” page will come into view:
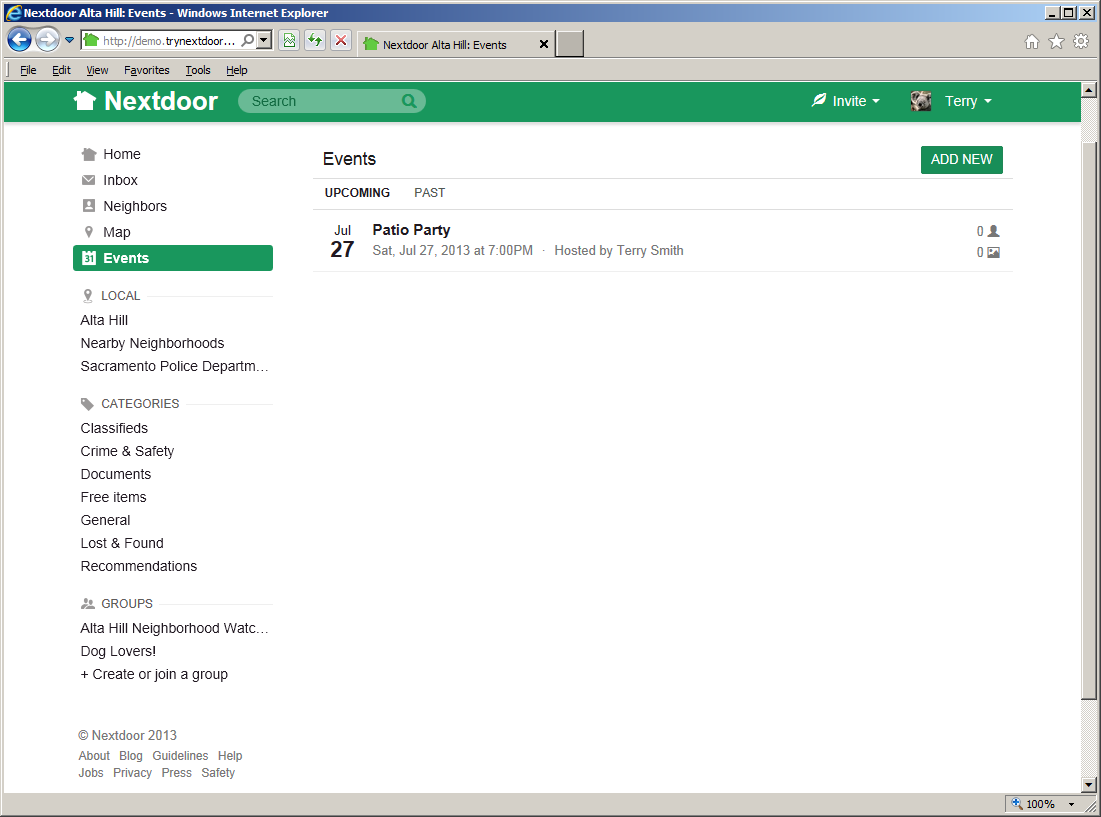
Initially, the “Events” page shows future events. To see events that occurred in the past, click the PAST link.
If one or more future events are scheduled, you will see information about each event:
the date and time of the event
a short description of the event (such as “Patio Party”)
the name of the person or organization that will host the event
at the right side of the page, numbers that show:
how many neighbors will be at the event
how many photos of the event are posted
To see more information about an event, click the event description. A page with more information will come into view:
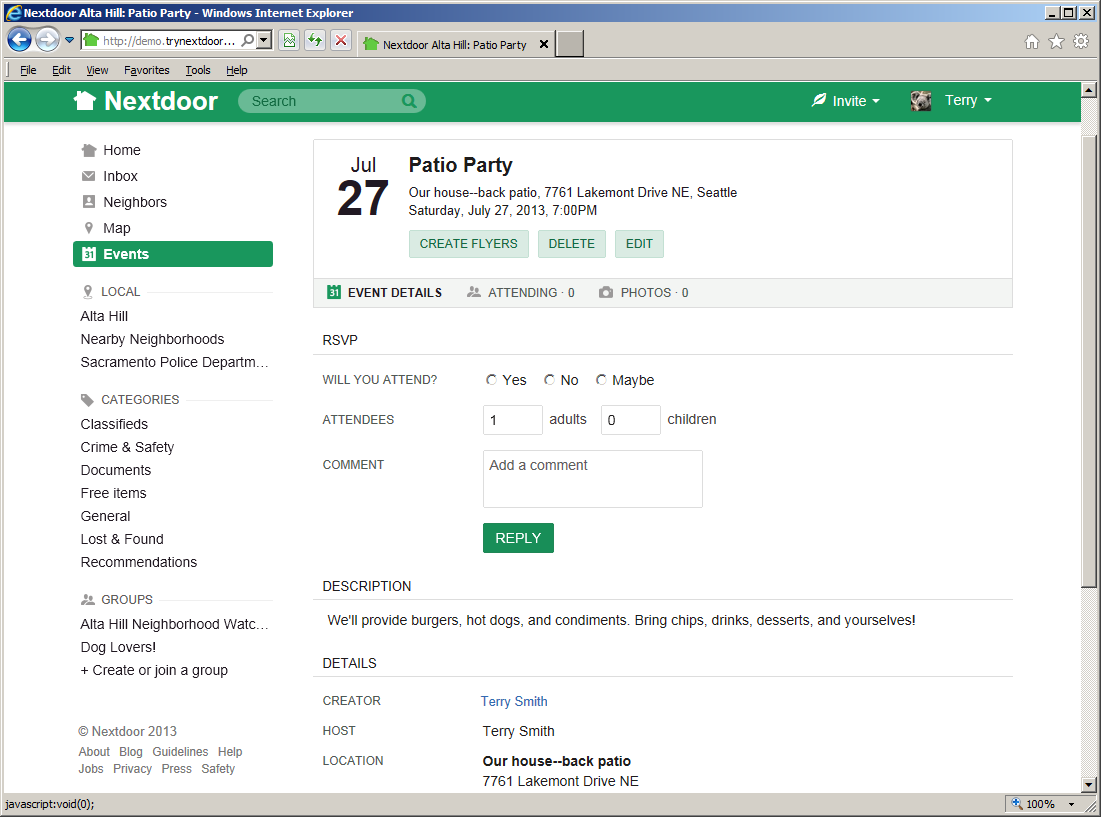
Use the links below the event description to see more information about the event:
EVENT DETAILS: Click the EVENT DETAILS link to see full information about the event.
ATTENDING: Click the ATTENDING link to see a list of neighbors who will be at the event.
PHOTOS: Click the PHOTOS link to see photos related to the event.
To tell the neighbor who scheduled the event if you will be there, complete the “RSVP” section of the page:
To the right of WILL YOU ATTEND?, click Yes, No, or Maybe.
If you click Yes or Maybe, you can tell the neighbor how many people from your address will be at the event. Click the the adults box and type a number. If one or more children will be at the event, click in the children box and type a number.
If you want, you can add a short message (such as
We will bring chairs!) that the neighbor will see. Click in the Add a comment box, then type your message.Click the green button.
Note
To change your reply, you can click the Change your reply link in the “RSVP” section of the event page.
Note
You can use the “Events” page to schedule events for all neighborhood residents. If your event is not open to all neighborhood residents, do not add it to the “Events” page. To schedule an event that is open to only some neighborhood residents, you can use private messages or a private group. (For help with private messages, see Chapter 8, How to Read and Send Messages, Section 8.3, “Private Messages”. For help with private groups, see Chapter 9, Groups.)
To add a new event:
Click the green button near the top right corner of the “Events” page. A “Create an event” form will come into view:
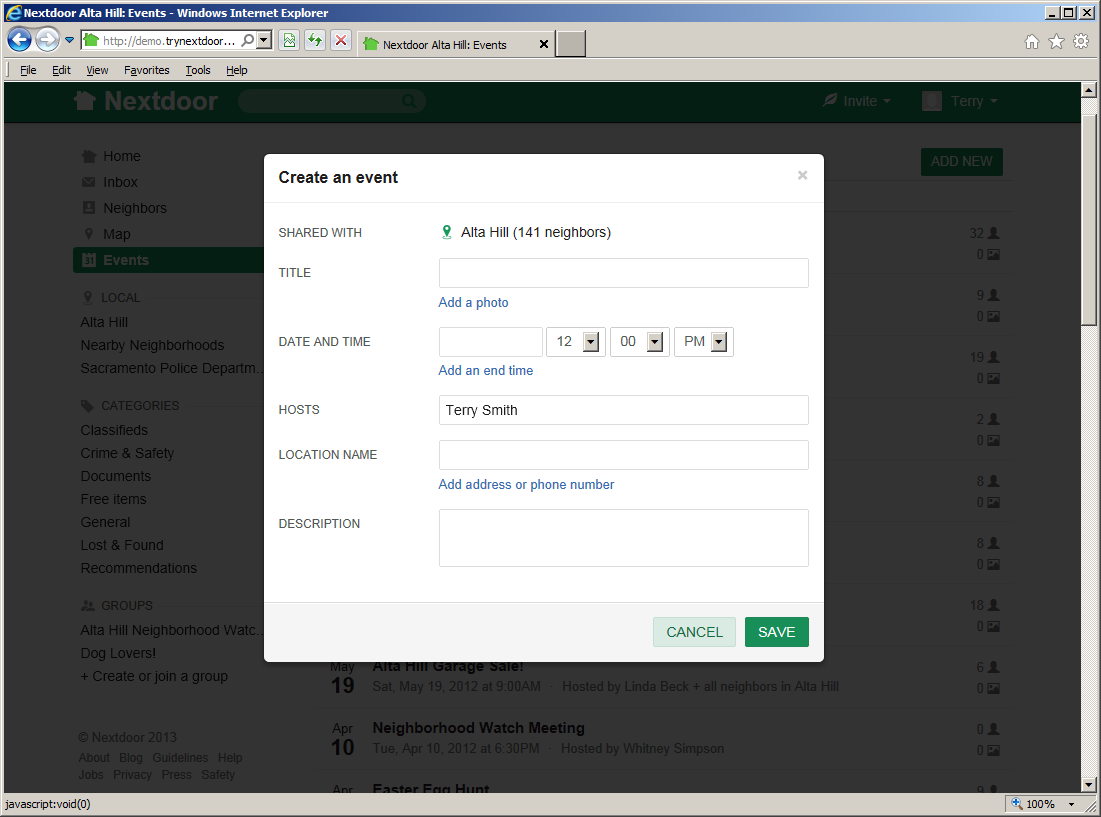
Complete the “Create an event” form:
Click in the TITLE box. Type a short description for the event, such as
Backyard BBQ.If you want to add a photo to the event, click the Add a photo link.
Click the gray button. A dialog box from your computer will come into view.
Use the dialog box to find the directory or folder on your computer that contains the photo file.
When you find the file, select it.
Click in the DATE AND TIME box. A calendar will come into view. The calendar shows today's date. To move to a different month and/or year, click the right-arrow symbol to the right of the month and year. When the calendar shows the correct month and year, click the number for the day of the event. You will see the date you chose in the DATE AND TIME box.
If the event does not start at noon, set the event start time with the three boxes to the right of the date box:
Click the down-arrow symbol to the right of the 12. A list of hours (1 thru 12) will drop down. Click the hour that the event starts.
If the event starts at 5 minutes or more after the hour, click the down-arrow symbol to the right of the 00. A list of minutes (05 thru 55) will drop down. Click the minute that the event starts.
If the event starts before noon, click the down-arrow symbol to the right of PM. A list that includes AM and PM will drop down. Click AM.
If you want to add an end time, click the Add an end time link. An END TIME line will come into view. Do the step above again to set the end time.
The HOSTS line shows your name. If you are not the host of the event, click in the HOSTS box, then use the <Delete> and/or <Backspace> keys to delete your name. Type the name of the person or organization that will host the event.
Click in the LOCATION NAME box. Type a description for the location of the event, such as
My back yard.If you want, you can add an address to the event.
Note
If you add an address, Nextdoor can display a map of the address when neighbors click the event.
To add an address and/or phone number to the location, click the Add address or phone number link. ADDRESS, CITY, and PHONE lines will come into view. Click in the ADDRESS, CITY, and/or PHONE box, then type the information.
Click in the DESCRIPTION box. Type a longer description for the event, such as
We'll provide meat, bread, and BBQ sauce. You bring chips, dessert, beverages, and your appetites!If you want neighbors to let you know if they will be at the event, click the Allow RSVPs for this event box.
To schedule the event, click the green button.
Note
To not schedule the event, click the pale green button.
A page with full information about the event will come into view.
After you schedule an event, you can make changes to the event and see more information about the event.
Use the buttons below the event description to make flyers or change information about the event:
: If you want, Nextdoor can help you make flyers for your event. Nextdoor will make a PDF (Portable Document Format) file which contains information about your event. You can open and print the file with PDF software such as Adobe Reader.
Note
To download Adobe Reader, go to http://get.adobe.com/reader/.
To make flyers:
Click the green button. A “Print event flyers” page will come into view.
Click the green button. A “Your printable invitation is ready!” page will come into view.
Click the green button. If your web browser asks if you want to “open or save” (or “download”) the file, click the “save” or “download” selection.
Possibly a dialog box from your computer will come into view. Use the dialog box to find the directory or folder on your computer where you want to save the file.
Use software such as Adobe Reader to open and print the file.
Note
The flyers contain a website address that neighbors can use to RSVP for the event. Neighbors who are not Nextdoor members can use the website address to join Nextdoor.
: If you want to delete your event, click the green button. A “Delete this event?” form will come into view. To delete the event, click the green button. To not delete the event, click the pale green button.
: To make changes to your event, click the button. The “Create an event” form will come into view. Make the necessary changes to the event information, then click the green button. (To discard your changes, click the pale green button.)
Nextdoor works best when all your neighbors are members! As a member, you can invite other neighborhood residents to join.
Note
You can also invite people who do not live in your neighborhood to join Nextdoor. When they make their Nextdoor account, they will give Nextdoor their street address. Their account will be automatically added to their neighborhood's Nextdoor site, if it has one. If their neighborhood does not have a Nextdoor site, Nextdoor will invite them to start a site for their neighborhood.
You can invite neighbors to join Nextdoor:
by email
by postcard
with a flyer
Note
If you use Nextdoor for iPhone or Android, you can also invite neighbors by text message. For help with this, see Chapter 16, Nextdoor for iPhone, Section 16.1.10, “How to Invite Your Neighbors to Join with Nextdoor for iPhone” or Chapter 17, Nextdoor for Android, Section 17.10, “How to Invite Your Neighbors to Join with Nextdoor for Android”.
There is no cost to invite neighbors to join.
If a neighbor accepts your invitation, you will get credit for the invitation. Nextdoor will show a “leaf” symbol and the number of accepted invitations near your name on messages you post and on the “Neighbors” list.
To see which Nextdoor members have the most accepted invitations:
Click near the top right corner of the home page.
On the menu that drops down, click Top inviters. A “Top Inviters from
your neighborhood's name” page will come into view.The “Top Inviters” page includes a list of each Nextdoor member who has one or more accepted invitations. Members are shown in sequence by the number of accepted invitations they have.
You will see the number 1 to the left of the name of the member with the most accepted invitations. You will see a 2 to the left of the name of the member with the next highest number, etc. A T after a number shows that there is a tie between two or more members.
If you know a neighbor's email address, you can use it to invite them to join Nextdoor.
To invite neighbors by email:
Click near the top right corner of the home page.
On the menu that drops down, click Email. An “Invite your neighbors and friends to Nextdoor” page will come into view.

Select a procedure to enter one or more email addresses:
You can let Nextdoor read your contact list from an online account. Nextdoor can read contact information from a Gmail, Yahoo!, Hotmail, AOL, or Facebook account.
To let Nextdoor read contact information from an online account:
Click the button in the “Choose your address book” section for the account you want to use. For example, if you want to let Nextdoor read contact information from your Yahoo! account, click the button.
After you click the button, one or more new windows will possibly come into view. Read the procedures in the windows carefully, then do the procedures. These procedures will help you sign in to the online account that you chose and let Nextdoor read contact information from that account.
If Nextdoor can read the contact information, a list of names and email addresses will come into view. Above the list, you will see Select
##contact, where##is the number of names and addresses that Nextdoor read from your account.Caution
Initially, all the names and email addresses from your online account will be selected. Unless you want to invite all these people to join Nextdoor, click the box to the left of Select
##contact. Then you can select only the names and addresses of people you want to invite to join Nextdoor.To invite a person to join Nextdoor, make sure that the box to the left of their name is checked. If you do not want to invite a person to join, make sure their box is not checked.
Note
You can scroll up and down in the list of names and addresses. If the list of is long, you can use the Search box to look for a specified name. Click in the Search box, then type all or part of the name or address you want to find. (For example:
boborgmail.) The list will change to show only names or addresses that agree with the information you typed.
You can tell Nextdoor to read the contact list from email software such as Outlook, the Mac OS X address book, LinkedIn, the Windows address book, Windows Mail, or Palm Desktop.
To tell Nextdoor to read contact information from your email software:
Click the button in the “Choose your address book” section. An “Upload contact file” form will come into view. The “Upload contact file” form shows a list of email software.
Click the name of the email software that you use. A procedure to make a file that contains contact information will come into view.
Do the procedure for your email software.
After you make the file that contains contact information, click the green button. A dialog box from your computer will come into view.
Use the dialog box to find the directory or folder on your computer that contains the contact information file.
When you find the file, select it.
If Nextdoor can read the contact information, a list of names and email addresses will come into view. Above the list, you will see Select
##contact, where##is the number of names and addresses that Nextdoor read from the file.Caution
Initially, all the names and email addresses from the file will be selected. Unless you want to invite all these people to join Nextdoor, click the box to the left of Select
##contact. Then you can select only the names and addresses of people you want to invite to join Nextdoor.To invite a person to join Nextdoor, make sure that the box to the left of their name is checked. If you do not want to invite a person to join, make sure their box is not checked.
Note
You can scroll up and down in the list of names and addresses. If the list of is long, you can use the Search box to look for a specified name. Click in the Search box, then type all or part of the name or address you want to find. (For example:
boborgmail.) The list will change to show only names or addresses that agree with the information you typed.
You can type one or more email addresses manually:
Click in the Type or paste emails. Include one per line or separate with commas. box.
To type more than one address, press the <Enter> key or the comma (<,>) key on the keyboard after each email address.
Read the message in the Enter a message box.
If you want, you can change the message:
Click in the Enter a message box, then use the <Delete> and/or <Backspace> keys to delete text. Type the message you want to use.
To use a message that Nextdoor wrote, click the Use default message link at the right side of the Enter a message box.
To send the invitations, click the green button.
Note
To not send invitations, go back to the home page.
Nextdoor will send invitations to the email address or addresses you gave them. Invitations include your name (but not your email address) and the message from the Enter a message box. If a person who receives an invitation wants to join Nextdoor, they can click the green button in the email.
Note
If the person does not accept the first invitation, Nextdoor will send them up to four reminder emails. If the person does not want to receive more emails about your invitation, they can click the “unsubscribe” link at the bottom of the email.
If you do not want to use the above procedure, you can send your neighbor an invitation link with your usual email software:
Find and copy your invitation link:
Click near the top right corner of the home page.
On the menu that drops down, click Link. An “Sharable invitation link” page will come into view.
Click the green button to copy the link to your computer's memory. The message
Link copied to clipboardwill come into view above the button for a short time.
Start your email software.
Start a new email.
Enter the address or addresses of the people you want to invite as usual.
Type a short description of your message in the Subject line of the email. For example:
Come join your neighbors on NextdoorUse the “paste” function in your email software or your computer's operating system to paste your invitation link in the body of the email.
For example, if your email software has an menu, you can click , then .
On a Windows computer, you can use one of two procedures to paste the link:
Right-click in the body of the email. On the menu that comes into view, click .
Click in the body of the email, then press <Ctrl>+<V>.
If you want to include a message to your neighbor, press <Enter> one or two times to make some empty space. Then type your message.
Send the email as usual.
If you do not know a neighbor's email address, you can ask Nextdoor to send them a postcard through the U.S. Mail. Nextdoor lets you send up to five postcards each month.
To invite neighbors by postcard:
Click near the top right corner of the home page.
On the menu that drops down, click Postcards. A “Send postcard invitations” page will come into view:
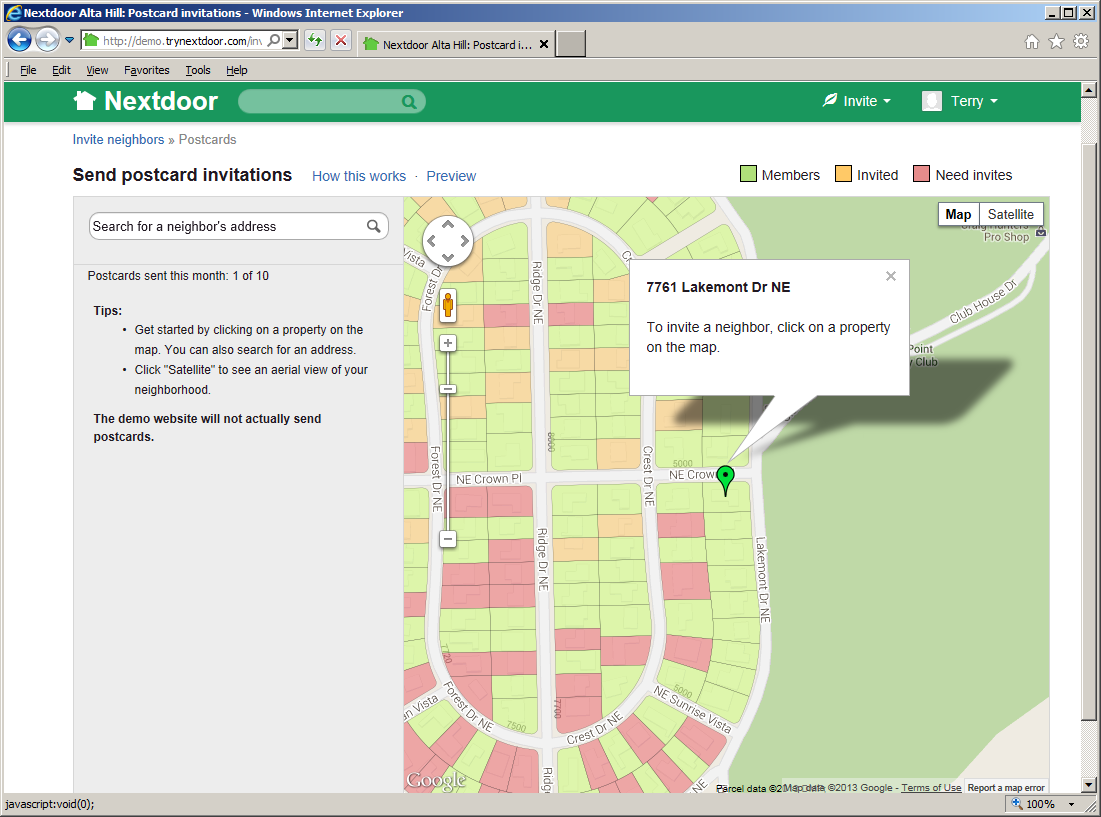
The page includes a map of the neighborhood.
The map uses different colors to show which neighbors are Nextdoor members:
Addresses shown in green are where Nextdoor members live.
Addresses shown in red have no Nextdoor members.
Addresses shown in pale orange have no Nextdoor members but were sent an invitation to join Nextdoor.
Make a list of the addresses where you want Nextdoor to send postcard invitations:
If you click an address shown in red, Nextdoor will add that address to the list.
If you click an address shown in pale orange, Nextdoor will show:
the street address you clicked
which Nextdoor member sent an invitation to that address
the date when the Nextdoor member sent an invitation to that address
an Invite them to join link
If you click an address shown in green, Nextdoor will show:
the Nextdoor member or members who live at that address
an Invite them to join link
You can type all or part of an address in the Search for a neighbor's address box near the top left corner of the page. If the information you type agrees with an address in your neighborhood, a list of addresses will drop down. Click the address that you want.
If that address is not shown in red on the map, Nextdoor will show some information about the address.
If you see a form that contains an Invite them to join link, a Nextdoor member has sent an invitation to that address. Or one or more people at that address are members of Nextdoor. You do not need to send an invitation to this address, but you can if you want to.
Note
If you sent a postcard invitation to this address in the last 60 days, Nextdoor will not let you send a second invitation.
If you want to send a second postcard invitation to the address:
Click the Invite them to join link. A form that shows the address, a Name box, and a Unit box will come into view.
If you know the name of a neighbor at that address, click in the Name box. Then type the neighbor's name.
Click the gray button.
Note
To remove an address from the list, move the mouse cursor on top of the address on the list. A gray X will come into view to the right of the address. Click the X.
Read the message in the Enter a message box.
If you want, you can change the message:
Click in the Enter a message box, then use the <Delete> and/or <Backspace> keys to delete the message. Type the message you want to use.
To use a message that Nextdoor wrote, click the Use default message link at the right side of the Enter a message box.
If you sent invitations in the past, you can click the Use message from last time link to use the same message again.
To send the invitations, click the green button.
Note
To not send invitations, go back to the home page.
Nextdoor will send an invitation to the neighbor by postcard. It is typical for neighbors to receive their postcard three to five days after you send the invitation.
You can print flyers to give to neighbors in person, to put on neighbors' doors, or to post in a public place. Nextdoor will save the information for your flyer in a PDF (Portable Document Format) file. You can open and print the file with PDF software such as Adobe Reader.
Note
To download Adobe Reader, go to http://get.adobe.com/reader/.
To invite neighbors with flyers:
Click near the top right corner of the home page.
On the menu that drops down, click Flyers. A “Printable invitation gallery” page will come into view:

The page shows small pictures of different flyers:
Standard Flyer
Business Card
Postcard
Note
Nextdoor will send up to five postcard invitations for you each month at no cost. (For help with postcard invitations, see Section 13.2, “Invite Neighbors By Postcard”.) But you can print postcards if you want to send more than five postcards a month, or to have more control of the postcards. For example, you can print postcards on different colors of paper.
Door Hanger
Flyer with tearoffs
Window sign (Business)
Window sign (Residential)
To see a larger picture of a flyer, click the See an example link below the name of the flyer. To close the larger picture, click the at the top right corner of the picture.
Click the small picture of the flyer you want to use.
If you did not select “Window sign (Business)” or “Window sign (Residential),” you can add a message to the flyer. Click in the Your message box near the bottom of the page. Type the message that you want to include on the flyer.
Note
There is a limit to the length of the message you can type. If you select “Standard Flyer,” you can type up to 425 characters. If you select “Flyer with tearoffs,” you can type up to 175 characters. If you select “Business Card,” “Postcard,” or “Door Hanger,” you can type up to 140 characters. You cannot add a message to “Window sign (Business)” or “Window sign (Residential)” flyers.
To use a message that Nextdoor wrote, click the Reset to default link at the left side of the Your message box.
Click the green button. A “Your printable invitation is ready!” page will come into view.
Read the “Printing Instructions” section of the page for information about how to print and use the flyer.
Click the green button.
If your web browser asks if you want to “open or save” (or “download”) the file, click the “save” or “download” selection.
Possibly a dialog box from your computer will come into view. Use the dialog box to find the directory or folder on your computer where you want to save the file.
Use software such as Adobe Reader to open and print the file.
To see a list of invitations you sent, and which were accepted:
Click near the top right corner of the home page.
On the menu that drops down, click Your invitations. A “Your invitations” page will come into view.
The page shows you:
how many of your invitations were accepted
your number on the “Top Inviters” list
the number of emails and postcards you sent, and the acceptance rate for each
To show only invitations sent by a specified method, click one or more boxes in the INVITATION TYPES section at the left side of the window. For example, to see only invitations sent by email, click the Email box.
The # Accepted page is shown automatically. This page shows a list of neighbors who accepted your invitation.
To see invitations you sent, click the # Sent tab.
When you invite a person by email and they do not accept the first invitation, Nextdoor will send them up to four reminder emails. You can click the Cancel link in the Status column to tell Nextdoor to not send more emails.
When a neighbor joins Nextdoor, you will see the message neighbor's name joined your neighborhood's name on the home page. If you want to, you can welcome the new neighbor to the website, and/or add a public message.
Note
When you click the button below a message about a new neighbor, Nextdoor members in your neighborhood can see your name. If you click the button, Nextdoor members in your neighborhood can see your message.
To welcome a new neighbor, click the green button below the message about the new neighbor.
Note
If one or more neighbors welcome the new neighbor before you do, you will see a number at the right side of the button. For example, you will see if two neighbors welcomed the new neighbor.
To send a public message to the neighbor:
Click the green button below the message about the new neighbor.
Note
If one or more neighbors reply to the message before you do, you will see a number at the right side of the button. For example, you will see if two neighbors replied to the message.
An empty box will come into view below the message. Type your message into the empty box.
Click the green button below the message you typed.
You must use the Nextdoor website to do some functions.
For example, you must use the website to:
schedule an event
post a public message in a specified category and/or add a photo to the message
But you can read and reply to public and private messages by email.
Note
If you want to read and reply to messages by email, you must let Nextdoor send you emails. For help with your email settings, see Chapter 7, How to Change Your Nextdoor Settings, Section 7.2.4, “Account Settings” and Section 7.2.1, “Email Settings”.
Caution
Read emails from Nextdoor carefully to find out if the message is public or private. If you reply to a public message, all Nextdoor members who can see the initial message can also see your reply.
For help with public messages, see Chapter 8, How to Read and Send Messages, Section 8.1, “Public Messages”. For help with private messages, see Chapter 8, How to Read and Send Messages, Section 8.3, “Private Messages”.
Note
Usually, Nextdoor will send you some emails each week. If you receive no emails from Nextdoor for a week or more, possibly Nextdoor does not have your correct email address. Sign in to the Nextdoor website and make sure your email settings are correct. For help with your email settings, see Chapter 7, How to Change Your Nextdoor Settings, Section 7.2.4, “Account Settings” and Section 7.2.1, “Email Settings”.
If none of the emails Nextdoor sends to you can be delivered, Nextdoor will stop sending you email. If Nextdoor stops sending you email, you will see a message about this on the home page when you sign in to the Nextdoor website.
When Nextdoor sends you an email about a public message posted by a neighbor:
for new messages, the subject of the email is
neighbor's namesaid "message description"Terry Smith said "Free tomatoes and zucchini!").for replies, the subject of the email is
neighbor's namereplied toneighbor's namepost re: "message description" (for example, Mary Jones replied to Terry Smith's post re: Free tomatoes and zucchini!the first line of the email is
neighbor's namefromneighborhood namesaid:Note
If the neighbor uses the iPhone app, the first line of the email will be
neighbor's namefromneighborhood namesaid via Nextdoor for iPhone:Note
If the neighbor included a photo with the message, the first line of the email will be
neighbor's namefromneighborhood nameadded a photo and said:the line below the message shows how many neighborhoods the initial message is shared with:
If the neighbor shared the message with your neighborhood only, the line is
Shared with.your neighborhood's nameonlyIf the neighbor shared the message with one or more Nearby Neighborhoods, the line is
Shared with, whereyour neighborhood's nameand#nearby neighborhoods#
if the neighbor selected a category other than “General” for the message, the line below the message shows the category name.
To reply to a public message by email:
Caution
If you reply to a public message, each Nextdoor member who can see the initial message can also see your reply.
Caution
Some email software lets you automatically add personal information (your email address, your phone number, etc.) at the bottom of emails. If your email software adds personal information to your emails, Nextdoor members who can see your message will also see this personal information.
Use the “reply” function in your email software to start a reply.
Type your message in the body of the email. (If your email software shows the initial message, type your message above the initial message.)
Send the message as usual.
When Nextdoor sends you an email about a public message posted by a neighbor, you will see links at the bottom of the email. If you click one of these links, a new page will open in your web browser.
You will see these links:
View or reply: Click this link to see the message (and replies to the message) in your web browser.
Thank: Click this link to thank the neighbor for their message. A new page that shows the message will open in your web browser. You will see the message
You thankedbelow the message.neighbor's namePrivate message: Click this link to send a private message to the neighbor who posted the message. The message will come into view in your web browser for a short time. Then a “Send a message to
neighbor's name” form will come into view. For help with private messages, see Chapter 8, How to Read and Send Messages, Section 8.3, “Private Messages”.
Nextdoor can also send you emails when new members join Nextdoor. You can click the green button at the bottom of these emails to welcome new neighbors to the site. A new page that shows the message about the new neighbor will open in your web browser. You will see the message
When Nextdoor sends you an email about a private message from a neighbor:
the subject of the email is
neighbor's namesent you a message Re:message descriptionTerry Smith sent you a message Re: Can you babysit tonight?)the first line of the message is
neighbor's namejust sent you a message:Note
A message that includes the phrase
You just sent the following message tois a copy of a private message you sent to a neighbor.neighbor name
To reply to a private message by email:
Use the “reply” function in your email software to start a reply.
Type your message in the body of the email. (If your email software shows the initial message, type your message above the initial message.)
Send the message as usual.
If you have a question or problem and cannot find the answer in this manual, help is available!
If you have a question or problem related to Nextdoor:
Use your web browser to go to Nextdoor's “help” page at https://help.nextdoor.com/.
Note
To go to the help page from the Nextdoor website:
Click your name at the top right corner of the Nextdoor home page. On the menu that drops down, click . Or,
Click the Help link near the bottom left corner of the Nextdoor home page.
The help page will come into view.
The help page has a list of categories, such as “The Basics,” “Account and Settings,” and “Nextdoor for iPhone.” Below each category name is a list of articles. Click the name of an article to see the full article.
Note
Some categories have too many articles to fit on the help page. These categories have links to View All
##Articles. Click a View All##Articles link to see all articles for that category.If you do not see an article with the information you want, you can use the “search” box at the top of the help page. Type a word or phrase (such as
password) into the “search” box then click the button. A list of articles that contain your word or phrase will come into view.If you cannot find an article with the information you want, you can send a message to Nextdoor's technical support department.
To send a message to Nextdoor's technical support department:
Click the send us an email link at the bottom of the help page. An “Email Us” page will come into view.
The Your name (required) box will contain your name, and the Your email address (used on Nextdoor) (required) box will contain your email address. Be sure your email address is correct.
Click the down-arrow button at the right side of the Inquiry type (required) box. A list of items will drop down.
Click the item on the list that best agrees with your question or problem. For example, if you have a question or problem related to an invitation, click Invitation.
Possibly a new box will come into view. For example, if you clicked , a Type of Invitation (required) box will come into view.
If a new box comes into view:
Click the down-arrow button at the right side of that box. A list of items will drop down.
Click the item on that list that best agrees with your question or problem. For example, if your problem or question is related to an invitation you sent by postcard, click Postcard.
In the Subject (required) box, type a short message about your question or problem, for example,
Neighbor did not receive postcard invitation.In the Message (required) box, type a full message about your question or problem, for example,
I sent my neighbor at 1234 E. Main St. a postcard invitation 12 days ago. She did not receive the postcard. Our mail carrier said he has not seen any postcards from Nextdoor for more than a month.Click the button.
When Nextdoor receives your message, they will send you a “Confirmation of your Nextdoor help request” message by email. If more information is necessary to answer your question or repair your problem, Nextdoor will send you more messages.
Lead users, or “leads,” are Nextdoor members who help other members, and who help the website operate correctly. For example, leads can remove messages that contain bad language.
One of your neighborhood's leads will try to help if you have a question or problem:
related a neighbor
related to a message posted on Nextdoor
that Nextdoor's technical support department could not help you with
To see a list of leads for your neighborhood:
Click the Neighbors link on the home page. The “Neighbors” page will come into view.
Click the Leads tab at the top of the “Neighbors” page. A list of your neighborhood's leads will come into view.
To send a private message to a lead, click the button to the right of the lead's name. For help with private messages, see Chapter 8, How to Read and Send Messages, Section 8.3, “Private Messages”.
The Nextdoor app for iPhone is free, and lets you do most of the same functions as the Nextdoor website.
Note
Nextdoor for iPhone also works on iPod touch and iPad devices.
Nextdoor for iPhone is available in two different versions: Version 1 for iOS 6, and Version 2 for iOS 7. To see help for Version 1, see Section 16.1, “Nextdoor for iPhone Version 1 (for iOS 6)”.
Note
This manual does not include information about Nextdoor for iPhone Version 2. Information about Nextdoor for iPhone Version 2 will be included in a subsequent version of this manual.
You can use one of two different procedures to install Nextdoor for iPhone directly from your device:
With a web browser:
Start the web browser (such as Safari) on your iPhone.
Go to http://nextdoor.com/mobile. A “Get Nextdoor Mobile” page will come into view. You will see the green and white Nextdoor icon at the top of the page, and at the top right corner of the page:

Tap . The App Store page for the Nextdoor for iPhone will come into view.
Tap . The button's name will change to .
Tap to download and install Nextdoor for iPhone.
Note
If an “Apple ID Password” form comes into view, use the onscreen keyboard to type your Apple password. Then tap .
With the App Store app:
Tap the App Store icon on your iPhone.
Tap near the bottom left corner of the screen.
Look to the right of
 at the top left corner of the screen.
If you see the word Search to the right of
, tap .If you see something other than the word Search, tap at the top right corner of the screen.
Use the onscreen keyboard to type
nextdoor. A list of apps will come into view:
Tap
nextdoor for iphone. The App Store page for Nextdoor for iPhone will come into view:
Tap . The button's name will change to .
Tap to download and install Nextdoor for iPhone.
Note
If an “Apple ID Password” form comes into view, use the onscreen keyboard to type your Apple password. Then tap .
Note
You can also use the iTunes software for Windows or Mac to download Nextdoor for iPhone and install it on your device. For help with iTunes, see the menu in iTunes or the user guide for your device.
Tap the Nextdoor icon to start Nextdoor. The first time you use Nextdoor for iPhone, you must sign in to your Nextdoor account.
To sign in to your Nextdoor account:
Tap at the bottom left corner of the screen:
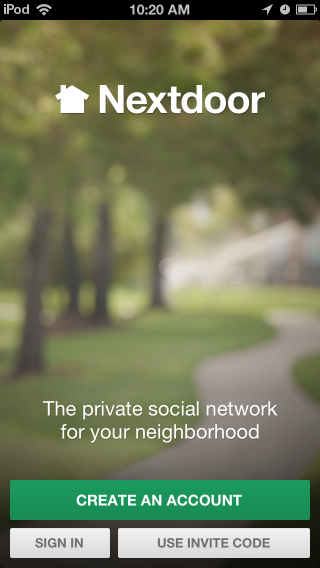
A “SIGN IN” screen will come into view:
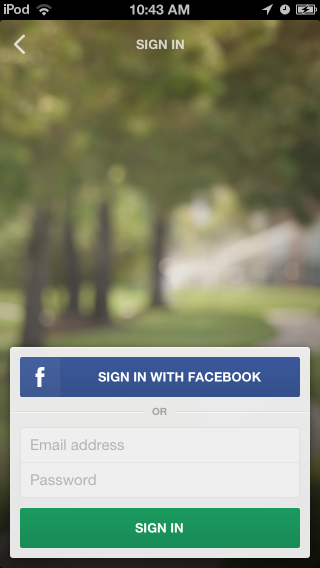
If you used Facebook to make your Nextdoor account:
Tap . A Facebook screen will come into view:

Tap Email or Phone. Use the onscreen keyboard to type the email address or phone number for your Facebook account.
Tap Password. Use the onscreen keyboard to type your Facebook password.
Tap .
If you did not use Facebook to make your Nextdoor account:
Tap Email address. Use the onscreen keyboard to type your email address.
Tap Password. Use the onscreen keyboard to type your Nextdoor password.
Tap .
The home screen for Nextdoor for iPhone will come into view:
Note
Pictures in this manual are from the “Nextdoor Alta Hill” website. Nextdoor Alta Hill is an example website that Nextdoor made to use for tests and demonstrations. The information on Nextdoor Alta Hill is not real.
Most people stay signed in to Nextdoor for iPhone. It is usually not necessary to sign out of Nextdoor for iPhone. But if you want to sign out, you can do that from the “Settings” screen. For help with this, see Section 16.1.11, “How to Change Your Settings with Nextdoor for iPhone”.
After you sign in to Nextdoor for iPhone, the home screen will come into view:
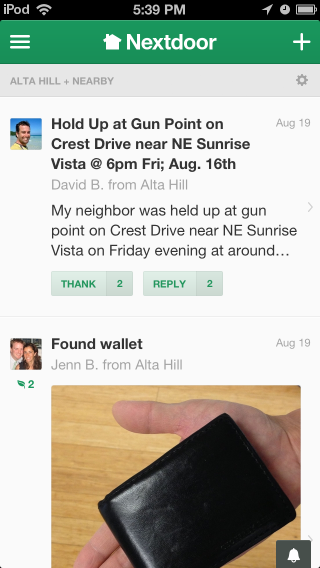
From the home screen, you can:
see notifications of new activity on Nextdoor
read messages, reply to messages, or thank neighbors for their messages. For help with this, see Section 16.1.5, “How to Read Messages with Nextdoor for iPhone”.
post new messages. For help with this, see Section 16.1.6, “How to Post Public Messages with Nextdoor for iPhone”.
welcome new members to Nextdoor. For help with this, see Section 16.1.10, “How to Invite Your Neighbors to Join with Nextdoor for iPhone”.
tap ≡ at the top left corner of the screen to see items in different categories:
Home: Tap Home to see the home screen.
Inbox: Tap Inbox to see private messages that you sent to other neighbors, or that other neighbors sent to you. For help with your inbox, see Section 16.1.7, “How to Send and Read Private Messages with Nextdoor for iPhone”.
Neighbors: Tap Neighbors to see a list of Nextdoor members in your neighborhood. For help with the neighbors list, see Section 16.1.9, “How to Find a Neighbor with Nextdoor for iPhone”.
Invite Neighbors: Tap Invite Neighbors to invite people to join Nextdoor. For help with invitations, see Section 16.1.10, “How to Invite Your Neighbors to Join with Nextdoor for iPhone”.
Settings: Tap Settings to change your Nextdoor settings. For help with your Nextdoor settings, see Section 16.1.11, “How to Change Your Settings with Nextdoor for iPhone”.
A “LOCAL” section that includes:
your neighborhood's name: Tapyour neighborhood's nameto see only messages from your neighborhood.Nearby Neighborhoods: Tap Nearby Neighborhoods to see messages from your neighborhood, and also residents of Nearby Neigborhoods. For help with Nearby Neighborhoods settings, see Section 16.1.11, “How to Change Your Settings with Nextdoor for iPhone”.
If your city is a member of the Nextdoor City Program, a link to information from your city officials, police department, and/or fire department. For more information on the Nextdoor City Program, go to http://help.nextdoor.com/customer/portal/articles/1148541-what-is-the-nextdoor-city-program-?b_id=98.
A “CATEGORIES” section that includes:
Classifieds: Tap Classifieds to see messages about items that neighbors want to sell or buy.
Crime & Safety: Tap Crime & Safety to see messages about crime and safety.
Documents: Tap Documents to see a list of files that neighbors share with other neighbors.
Files can be in different formats, for example:
Picture or photo files can have names that end with
.GIF,.JPG,.JPEG, or.PNG.Portable Document Format files have names that end with
.PDF. You can open PDF files with software such as Adobe Reader.Microsoft Word format files have names that end with
.DOCor.DOCX. You can open these files with Microsoft Word.Microsoft Excel format files have names that end with
.XLSor.XLSX. You can open these files with Microsoft Excel.
Nextdoor for iPhone can open files in the above formats. If a neighbor shares a file in a different format, Nextdoor for iPhone possibly will not open the file.
Free items: Tap Free items to see messages about items that neighbors want to give away for free.
General: Tap General to see messages that do not fit into some other category.
Lost & Found: Tap Lost & Found to see messages about lost or found pets or items.
Recommendations: Tap Recommendations to see messages about companies or services neighbors used, and if the neighbors recommend those companies or services.
A “GROUPS” section that shows a list of the public and private groups of which you are a member. For help with groups, see Section 16.1.8, “How to Use Groups on Nextdoor for iPhone”.
An “Info” section that includes:
Share This App: Tap Share This App to send an email to a person about Nextdoor. The email includes a link to download Nextdoor for iPhone. For more help, see Section 16.1.10, “How to Invite Your Neighbors to Join with Nextdoor for iPhone”.
Contact Us: Tap Contact Us to send a message to Nextdoor. For more help, see Section 16.1.12, “How to Get Help for Nextdoor for iPhone”.
Help: Tap Help to go to Nextdoor's “help” page. For help with Nextdoor's “help” page, see Section 16.1.12, “How to Get Help for Nextdoor for iPhone”.
About Us: Tap About Us to see information about Nextdoor.
The About Us information includes:
the version number of the Nextdoor for iPhone app
buttons to let you see Nextdoor's Privacy Policy and Member Agreement
Nextdoor's Manifesto
To refresh the information on the home screen (to see new messages), drag down with your finger from the top of the screen.
Notifications are short messages about the newest information posted on Nextdoor, or about private messages that neighbors sent to you.
To see a list of notifications:
Tap
 at the bottom right corner of the home screen:
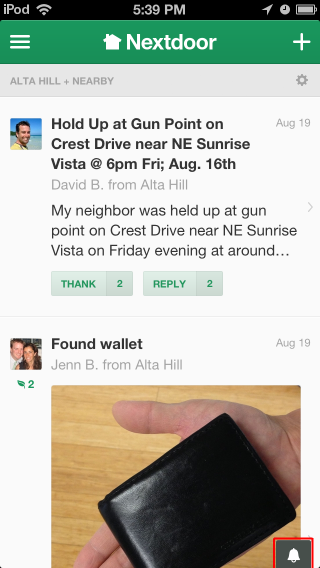
Note
If you see a number to the right of
 , it shows how many notifications you have not read.
If
 is red, it shows that there is an urgent alert.
A list of message descriptions will come into view at the bottom of the screen:
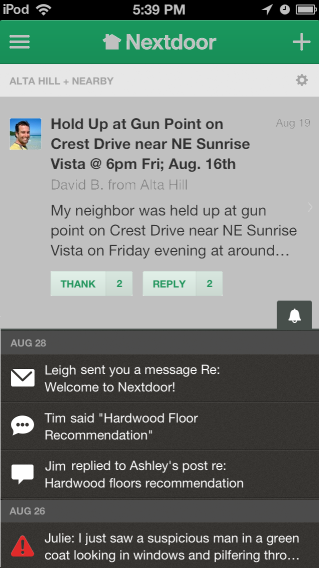
Tap on a message description to see the full message, or tap
again to close the notifications list.
You can also see notifications from Nextdoor for iPhone in the iPhone Notification Center. To see the Notification Center, swipe down from the top of the screen. You can use your finger to drag up or down to scroll through the list of notifications.
Note
If you do not see notifications from Nextdoor for iPhone in the Notification Center:
Tap Settings, Notifications. A list of apps will come into view.
Scroll through the list of apps until you see Nextdoor.
Tap Nextdoor. The notification settings for Nextdoor will come into view.
Make sure that Notification Center is set to
ON.You can also set:
how many notifications to show for Nextdoor for iPhone.
the Alert Style.
if the Badge App Icon is
ONorOFF. If it is isON, the number of notifications will show on the Nextdoor icon.if Sounds are
ONorOFF.if View in Lock Screen is
ONorOFF. If it isON, Nextdoor for iPhone notifications will show when the iPhone is locked.
The home screen shows public messages and messages posted to your groups. Nextdoor for iPhone shows the first three lines of each message. If a message is longer than that, you can tap the subject (description) at the top of the message to see the full message:
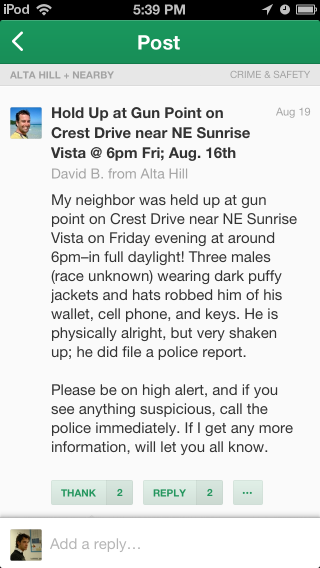
If there are one or more replies to the message, you will see those when you see the full message. To go back to the home screen after you read the message, tap < at the top left corner of the screen.
The list of messages is too long to fit on one screen. But you can use your finger to drag up or down to scroll.
To read only messages in a specified category, tap ≡ at the top left corner of the screen then tap the category:
Home: Tap Home to see the home screen.
Inbox: Tap Inbox to see private messages that you sent to other neighbors, or that other neighbors sent to you. For help with private messages, see Section 16.1.7, “How to Send and Read Private Messages with Nextdoor for iPhone”.
Neighbors: Tap Neighbors to see a list of Nextdoor members in your neighborhood. For help with the neighbors list, see Section 16.1.9, “How to Find a Neighbor with Nextdoor for iPhone”.
Invite Neighbors: Tap Invite Neighbors to invite people to join Nextdoor. For help with invitations, see Section 16.1.10, “How to Invite Your Neighbors to Join with Nextdoor for iPhone”.
Settings: Tap Settings to change your Nextdoor settings. For help with your Nextdoor settings, see Section 16.1.11, “How to Change Your Settings with Nextdoor for iPhone”.
A “LOCAL” section that includes:
your neighborhood's name: Tapyour neighborhood's nameto see only messages from your neighborhood.Nearby Neighborhoods: Tap Nearby Neighborhoods to see messages from your neighborhood, and also residents of Nearby Neigborhoods. For help with Nearby Neighborhoods settings, see Section 16.1.11, “How to Change Your Settings with Nextdoor for iPhone”.
If your city is a member of the Nextdoor City Program, a link to information from your city officials, police department, and/or fire department. For more information on the Nextdoor City Program, go to http://help.nextdoor.com/customer/portal/articles/1148541-what-is-the-nextdoor-city-program-?b_id=98.
A “CATEGORIES” section that includes:
Classifieds: Tap Classifieds to see messages about items that neighbors want to sell or buy.
Crime & Safety: Tap Crime & Safety to see messages about crime and safety.
Documents: Tap Documents to see a list of files that neighbors share with other neighbors.
Files can be in different formats, for example:
Picture or photo files can have names that end with
.GIF,.JPG,.JPEG, or.PNG.Portable Document Format files have names that end with
.PDF. You can open PDF files with software such as Adobe Reader.Microsoft Word format files have names that end with
.DOCor.DOCX. You can open these files with Microsoft Word.Microsoft Excel format files have names that end with
.XLSor.XLSX. You can open these files with Microsoft Excel.
Nextdoor for iPhone can open files in the above formats. If a neighbor shares a file in a different format, Nextdoor for iPhone possibly will not open the file.
Free items: Tap Free items to see messages about items that neighbors want to give away for free.
General: Tap General to see messages that do not fit into some other category.
Lost & Found: Tap Lost & Found to see messages about lost or found pets or items.
Recommendations: Tap Recommendations to see messages about companies or services neighbors used, and if the neighbors recommend those companies or services.
A “GROUPS” section that shows a list of the public and private groups of which you are a member. For help with groups, see Section 16.1.8, “How to Use Groups on Nextdoor for iPhone”.
Caution
When you tap or , neighbors who can see the initial message can see your name. If you reply to a public message, neighbors who can see the initial message can also see your message.
If residents of Nearby Neighborhoods can see the initial message, they can see your name/message. They can also see some or all of your profile information.
For more information about Nearby Neighborhoods, see Chapter 6, Nearby Neighborhoods. For help with your Nearby Neighborhood settings in Nextdoor for iPhone, see Section 16.1.11, “How to Change Your Settings with Nextdoor for iPhone”.
If you agree with a message or think the information in the message is good, you can tap . will change to , and the message Thanked by you will come into view below the message.
Note
If one or more neighbors tap , you will see a number at the right side of . For example, you will see if three neighbors tapped .
Note
If you tapped by accident (and changed to ), you can tap . The number at the right side of will decrease by 1, and Nextdoor will remove your name from the Thanked by... message.
If you tap , you do not need to reply to the message. (But you can reply if you want to.)
To reply to a public message:
Tap .
Note
If one or more neighbors reply to the message before you do, you will see a number at the right side of button. For example, you will see if two neighbors replied to the message.
An “Add a reply” box will come into view. Use the onscreen keyboard to type your message.
Tap at the top right corner of the screen to send your reply.
Note
To not send a reply, tap at the top left corner of the screen.
If you see a public message that contains bad language, advertising, or other inappropriate information, you can “flag” the message. This tells the lead user(s) for your neighborhood that the message must be reviewed and possibly deleted.
To flag a message:
Tap the subject (description) at the top of the message to see the full message.
Tap below the message.
Tap .
A “Please select a reason” form will come into view.
Tap a reason:
Note
To not flag the message, tap .
If you tap again, you will see the message .
To post a new public message:
Tap at the top right corner of the screen. will change to .
Note
To not post a new message, tap X.
To post a new public message:
Tap . A “CHOOSE NEIGHBORS” screen will come into view.
Select who can see your message:
your neighborhood's nameonly: Tap this if you want only your neighborhood's residents to see your message.your neighborhood's name+ Nearby: Click this if you want Nearby Neighborhood residents to see your message.Note
If no Nearby Neighborhoods are turned on, you will not see this.
After you tap
your neighborhood's name+ Nearby, a list of your Nearby Neighborhoods will come into view. To not send the message to one or more Nearby Neighborhoods, tap to the right of that neighborhood's name.
the names of your groups: If you are a member of one or more groups, you will see the groups' names on the list. Click a group name if you want only members of that group to see your message.
Tap at the top right corner of the screen.
Use the onscreen keyboard to type a subject (description) of the message.
Tap in the “Write a message” box. Use the onscreen keyboard to type your message.
To add a photo to your message:
Tap
 at the bottom right corner of the “Write a message” box.
To take a new photo, tap
. To select a photo from your iPhone, tap  .
.Note
To not add a photo to your message, tap at the top left corner of the screen.
The photo you take or select will come into view.
To use this photo, tap . To take or select a new photo, tap
at the top left corner of the screen to go back one screen.
Tap at the top right corner of the screen. A “CHOOSE A CATEGORY” screen will come into view.
Tap ○ to the right of the best category for your message (Classifieds, Crime & Safety, Free Items, General, Lost & Found, or Recommendations).
To post the message, tap at the top right corner of the screen.
Note
To cancel the message, tap two times, then , then .
To post a photo:
Tap .
To take a new photo, tap
. To select a photo from your iPhone, tap .Note
To not add a photo to your message, tap at the top left corner of the screen.
The photo you take or select will come into view.
To use this photo, tap . To take or select a new photo, tap
at the top left corner of the screen to go back one screen.A “WRITE A MESSAGE” screen will come into view.
Tap in the “Add a subject” box. Use the onscreen keyboard to type a subject (description) of the photo.
Tap in the “Write a message” box. Use the onscreen keyboard to type a message about the photo.
Tap at the top right corner of the screen. A “CHOOSE NEIGHBORS” screen will come into view.
Select who can see your photo:
your neighborhood's nameonly: Tap this if you want only your neighborhood's residents to see your photo.your neighborhood's name+ Nearby: Click this if you want Nearby Neighborhood residents to see your photo.Note
If no Nearby Neighborhoods are turned on, you will not see this.
After you tap
your neighborhood's name+ Nearby, a list of your Nearby Neighborhoods will come into view. To not send the photo to one or more Nearby Neighborhoods, tap to the right of that neighborhood's name.the names of your groups: If you are a member of one or more groups, you will see the groups' names on the list. Click a group name if you want only members of that group to see your photo.
Tap at the top right corner of the screen. A “CHOOSE A CATEGORY” screen will come into view.
Tap ○ to the right of the best category for your photo (Classifieds, Crime & Safety, Free Items, General, Lost & Found, or Recommendations).
To post the photo, tap at the top right corner of the screen.
Note
To cancel the message, tap two times, then , then .
To send an urgent alert:
Caution
Only send urgent alerts for crime or safety issues that your neighbors must know about immediately. If applicable, call 911 before you send an urgent alert.
Tap .
Use the onscreen keyboard to type your message.
Note
The message can be no more than 110 characters long. Nextdoor for iPhone shows the number of available characters at the bottom right corner of the “Write a message” box. If you type more than 110 characters, the number will be red.
To post the message, tap at the top right corner of the screen.
Note
To cancel the message, tap .
To send an invitation to join Nextdoor, tap . For help with invitations, see Section 16.1.10, “How to Invite Your Neighbors to Join with Nextdoor for iPhone”.
When you post a public message, you cannot make changes to that message. But you can delete the message.
To delete a public message that you posted:
Find the message that you want to delete.
Tap the subject (description) of the message to see the full message.
Tap below the message.
Tap .
Tap button.
Note
To not delete the message, tap .
When you tap on a message posted by a neighbor, neighbors who can see the initial message can see your name and message. If you do not want other neighbors to see your information, you can send a private reply.
To send a private reply to a public message:
Tap the subject (description) of the message to see the full message.
Tap below the message.
Tap .
Use the onscreen keyboard to type your message.
To send your message, tap at the top right corner of the screen.
Note
To not send the message, tap at the top left corner of the screen.
You can also send a private message that is not a reply to a public message. For help with this, see Section 16.1.9, “How to Find a Neighbor with Nextdoor for iPhone”.
Nextdoor keeps copies of your private messages in your Inbox.
To read messages in your Inbox:
Tap ≡ at the top left corner of the screen.
Tap Inbox. A list of messages in your Inbox will come into view. You can use your finger to drag up or down to scroll through the list.
To see a full message, tap the subject (description) of the message.
To send a private reply to a message in your Inbox:
While you can see the full message, tap in the “Add a reply...” box at the bottom of the message.
Use the onscreen keyboard to type your reply.
To send your reply, tap at the top right corner of the screen.
Note
To not send the reply, tap at the top left corner of the screen. Tap < at the top left corner of the screen to go back to your Inbox.
You can use Nextdoor for iPhone to read and post messages in groups of which you are a member.
Note
To see a list of all public groups, to join a group, or to make a new group, use the Nextdoor website. For help with groups on the website, see Chapter 9, Groups.
To read messages in a specified group:
Tap ≡ at the top left corner of the screen.
Tap the group's name in the “GROUPS” section. A list of messages in that group will come into view.
To post a message in a group:
Tap + at the top right corner of the screen to start a new message.
Tap . A “CHOOSE NEIGHBORS” screen will come into view.
Tap ○ to the right of the group's name.
Finish and send the message as usual.
Note
For help with this, see Section 16.1.6, “How to Post Public Messages with Nextdoor for iPhone”.
Tap ≡ at the top left corner of the screen.
Tap Neighbors. A list of neighborhood residents will come into view:
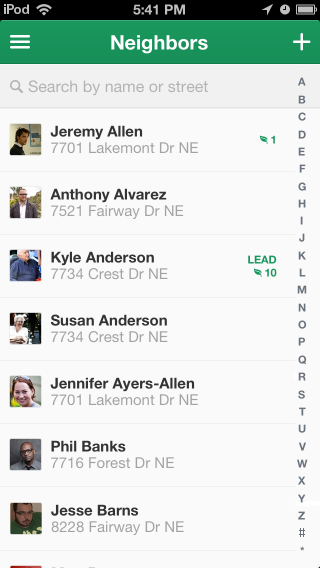
You can use your finger to drag up or down to scroll through the list. Or you can search for a neighbor by their name or street name:
Tap Search by name or street at the top of the screen.
Type part or all of the neighbor's first or last name, or street name. Results will come into view as you type.
When you see the neighbor's name, tap the name. The neighbor's profile screen will come into view:
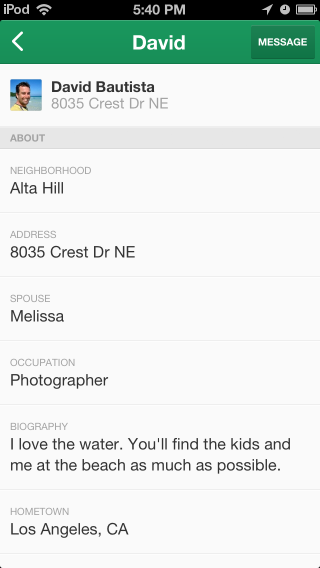
You can send a neighbor a private message from their profile page.
To send a neighbor a private message:
Tap at the top right corner of their profile page. A new screen will come into view:
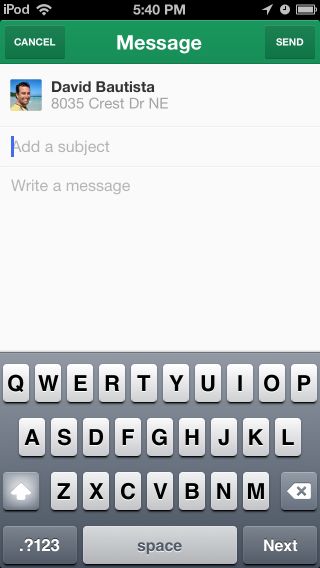
Tap in the “Add a subject” box. Type a subject (description) for the message.
Tap in the “Write a message” box. Type your message.
To send your message, Tap at the top right corner of the screen.
Note
To not send the message, tap at the top left corner of the screen.
Nextdoor works best when all your neighbors are members! As a member, you can invite other neighborhood residents to join.
Note
You can also invite people who do not live in your neighborhood to join Nextdoor. When they make their Nextdoor account, they will give Nextdoor their street address. Their account will be automatically added to their neighborhood's Nextdoor site, if it has one. If their neighborhood does not have a Nextdoor site, Nextdoor will invite them to start a site for their neighborhood.
If you know a neighbor's email address, you can use it to invite them to join Nextdoor. This is the fastest procedure to let your neighbor join Nextdoor.
To send an invitation by email:
Tap ≡ at the top left corner of the screen, then tap Invite Neighbors.
Note
Or tap + at the top right corner of the home screen, then tap .
The “ALL CONTACTS” list, which shows information from your iPhone's Contacts list, will come into view. You can use your finger to drag up or down to scroll through the list. Or you can search for a neighbor by their name or email address:
Tap in the “Add an email or search by name” box near the top of the screen.
Use the onscreen keyboard to type part or all of the neighbor's name. Results will come into view as you type.
Tap ○ to the left of the names of the persons you want to send invitations to.
To send an invitation to an email address that is not on the “ALL CONTACTS” list:
Tap in the “Add an email or search by name” box near the top of the screen.
Use the onscreen keyboard to type the email address.
Tap .
Note
If you want to send an invitation to all the people on your Contacts list, tap at the bottom left corner of the screen.
To change all the email addresses you have selected to not selected, tap at the bottom right corner of the screen.
If you want, repeat the step above to select more email addresses.
Tap at the top right corner of the screen. An “Invitation” screen will come into view. The
Invitingmessage near the top of the screen shows how many email addresses you selected.#person/peopleYou will see this message:
My neighborhood is using a private online network called Nextdoor.your neighborhood's name. On our Nextdoor site, neighbors share community events, recommendations, items for sale, crime reports, ideas about how to improve our neighborhood and more. I think you and your neighborhood could benefit tooIf you want, use the onscreen keyboard to change the message.
When the message is satisfactory, tap at the top right corner of the screen to send the invitation.
Note
To not send the invitation, tap < at the top left corner of the screen, then tap .
You can also use Share This App to send a person an email about Nextdoor. The email includes a link to download Nextdoor for iPhone.
To use Share This App:
Tap ≡ at the top left corner of the screen.
Tap Share This App.
Tap the Mail icon. A “New Message” screen will come into view.
Tap in the “To” box. Use the onscreen keyboard to type an email address.
Note
Or, to select an email address from your iPhone Contact list, tap ⊕ at the right side of the “To” box.
Tap in the “Subject” box. Use the onscreen keyboard to type a subject (description) of the message.
You will see the message:
Join @Nextdoor, the private social network for neighborhoods, and start connecting with your neighbors.The message includes a link to download Nextdoor for iPhone. If you want, use the onscreen keyboard to change the message. But if you want to include the link to download Nextdoor for iPhone, make sure not to delete or change the link.
When the message is satisfactory, tap at the top right corner of the screen to send the message.
Note
To not send the message, tap at the top left corner of the screen. Then tap to discard the message.
When a neighbor joins Nextdoor, you will see the message neighbor's name joined on the home screen. If you want to, you can welcome the new neighbor to Nextdoor, and/or add a public message.
Caution
When you tap below a message about a new neighbor, Nextdoor members in your neighborhood can see your name. If you tap , Nextdoor members in your neighborhood can see your message.
To welcome a new neighbor, tap below the message about the new neighbor.
Note
If one or more neighbors welcome the new neighbor before you do, you will see a number at the right side of . For example, you will see if two neighbors welcomed the new neighbor.
To send a public message to the neighbor:
Tap below the message about the new neighbor.
Note
If one or more neighbors reply to the message before you do, you will see a number at the right side of . For example, you will see if two neighbors replied to the message.
An “Add a reply” box will come into view. Use the onscreen keyboard to type your message.
To send your reply, tap at the top right corner of the screen.
Note
To not send a reply, tap at the top left corner of the screen.
To change your Nextdoor settings with Nextdoor for iPhone:
Tap ≡ at the top left corner of the screen.
Tap Settings. A “Settings” screen will come into view:
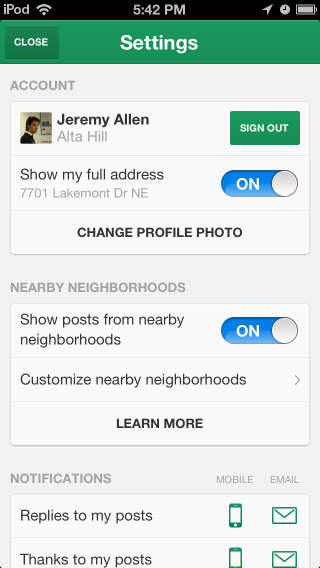
You can use the “Settings” screen to:
sign out of Nextdoor. To sign out, tap . The message
Are you sure you want to sign out of the app?will come into view. If you want to sign out, tap .Note
If you do not want to sign out, tap .
tell Nextdoor to show your full address or only your street name to your neighbors. To show your full address, make sure Show my full address is set to
ON. To show only your street name, make sure Show my full address is set toOFF.change your profile photo.
To change your profile photo:
Tap CHANGE PROFILE PHOTO.
To take a new photo with your iPhone, or to select a photo from your iPhone:
Tap .
To take a new photo, tap
. To select a photo from your iPhone, tap .Note
To not change your profile photo, tap at the top left corner of the screen.
The photo you take or select will come into view.
To use your Facebook profile photo as your Nextdoor profile photo
Tap .
If you are not signed in to your Facebook account, use the onscreen keyboard to type your email address or phone number and password. Tap .
change your Nearby Neighborhood settings:
If you want to see messages from Nearby Neighborhoods, make sure Show posts from nearby neighborhoods is set to
ON. If you do not want to see messages from Nearby Neighborhoods, make sure Show posts from nearby neighborhoods is set toOFF.To change which Nearby Neighborhoods are turned on:
Tap Customize nearby neighborhoods. A map of your neighborhood and its Nearby Neighborhoods will come into view. You will see a list of Nearby Neighborhoods at the right side of the map.
To see messages from a specified neighborhood, make sure the ON/OFF button to the right of its name is set to
ON. If you do not want to see messages from a specified neighborhood, make sure the ON/OFF button to the right of its name is set toOFF.When your Nearby Neighborhoods settings are correct, tap < at the top left corner of the screen.
To see more information about Nearby Neighborhoods, tap LEARN MORE.
tell Nextdoor if you want to receive mobile notifications (with Nextdoor for iPhone) or email notifications for different message categories.
You can receive notifications with Nextdoor for iPhone, email, or both, for these categories:
Replies to my posts
Thanks to my posts
Neighbors welcoming me
Urgent post alerts
New neighbors joining
Crime & Safety posts
Classifieds posts
Free items posts
Lost & Found posts
Recommendations posts
Neighbor posts
Nearby neighbor posts
Neighbor replies
Nearby neighbor replies
You can receive notifications with Nextdoor for iPhone for these categories:
Private messages
Daily activity summary
If the mobile (
 ) or email (
 ) icon to the right of a category is green, notifications are on for that mode and category. If the icon is gray, notifications are off for that mode and category. To change the notification setting for a category, tap or .
If you have a question or problem related to Nextdoor:
Tap ≡ at the top left corner of the screen.
Tap Help. A “Nextdoor | FAQ” (Frequently Asked Questions) screen will come into view:

The “Nextdoor | FAQ” screen has a list of categories, such as “The Basics,” “Account and Settings,” and “Nextdoor for iPhone.”
You can use your finger to drag up or down to scroll through the list of categories on the “Nextdoor | FAQ” screen. To see more information about a category, tap the category's name. A list of articles in that category will come into view. Tap an article's name to see the full article.
If you do not see an article with the information you want, tap in the “Search” box at the top of the screen. Use the onscreen keyboard to type a word or phrase (such as
password). Then tap at the bottom right corner of the screen. A list of articles that contain your word or phrase will come into view.To close the “Nextdoor | FAQ” screen, tap at the top left corner of the screen.
You can send a message to Nextdoor's technical support department:
if you cannot find the information you want on the “Nextdoor | FAQ” screen.
if you have a problem or see an error message more than one time in Nextdoor for iPhone.
Note
Before you send a message about a problem or error message, sign out of Nextdoor for iPhone, then sign back in. This will possibly repair the problem.
to tell Nextdoor about a change that you want in Nextdoor for iPhone.
To send a message to Nextdoor's technical support department:
Tap ≡ at the top left corner of the screen.
Tap Contact Us.
To tell Nextdoor about a problem or error message, tap .
To tell Nextdoor about a change that you want in Nextdoor for iPhone, tap .
Nextdoor for iPhone will start a new email message. The “To,” “From,” and “Subject” boxes will be completed for you. The body of the message will contain
I found this issue:orI have this feedback:.Tap in the body of the message, below
I found this issue:orI have this feedback:. Use the onscreen keyboard to type a message about the problem or the change that you want.To send your message, tap at the top right corner of the screen.
Note
To not send the message, tap at the top left corner of the screen. Then tap to discard the message.
Coming soon!
You can install Nextdoor for iPhone Version 2 if your Apple device has iOS 7 on it.
These devices can use iOS 7:[2]
iPhone 4 and 4s
iPhone 5, 5c, and 5s
iPod touch 5th generation
iPad 2
iPad with Retina display
iPad Air
iPad mini
iPad mini with Retina display
The Nextdoor app for Android is free, and lets you do most of the same functions as the Nextdoor website.
Note
The instructions and pictures in this manual were made with a phone that uses Android version 4.3. If your Android device uses a different version of Android, screens will possibly look different than the pictures shown in this manual. Possibly you will need to change the instructions for your Android device.
To install Nextdoor for Android:
Tap the Play Store icon on your Android device.
Tap
near the top of the screen.Use the onscreen keyboard to type
nextdoor. A menu with a list of apps will drop down.Tap
nextdoor. A list of apps will come into view.Tap Nextdoor.
Tap to download and install Nextdoor for Android.
Tap the Nextdoor icon to start Nextdoor. The first time you use Nextdoor for Android, you must sign in to your Nextdoor account.
To sign in to your Nextdoor account:
Tap Email address. Use the onscreen keyboard to type your email address.
Tap Password. Use the onscreen keyboard to type your Nextdoor password.
Tap .
The home screen for Nextdoor for Android will come into view:
Note
Pictures in this manual are from the “Nextdoor Alta Hill” website. Nextdoor Alta Hill is an example website that Nextdoor made to use for tests and demonstrations. The information on Nextdoor Alta Hill is not real.
Most people stay signed in to Nextdoor for Android. It is usually not necessary to sign out of Nextdoor for Android. But if you want to sign out, you can do that from the “Settings” screen. For help with this, see Section 17.11, “How to Change Your Settings with Nextdoor for Android”.
After you sign in to Nextdoor for Android, the home screen will come into view:
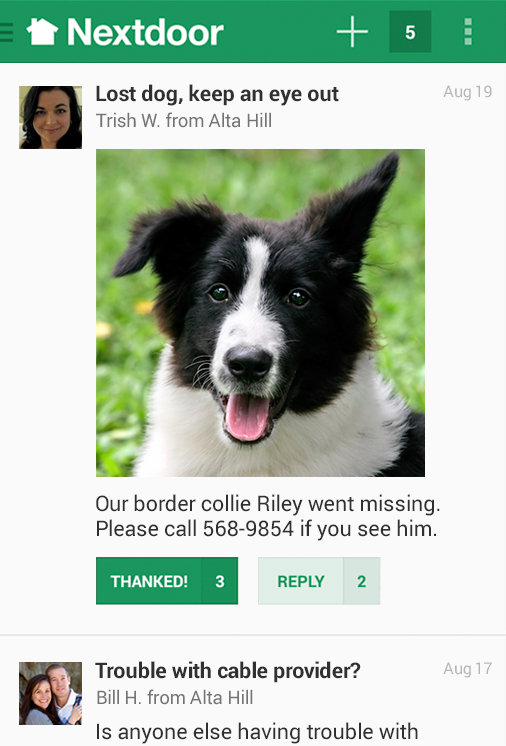
From the home screen, you can:
read messages, reply to messages, or thank neighbors for their messages. For help with this, see Section 17.5, “How to Read Messages with Nextdoor for Android”.
welcome new members to Nextdoor. For help with this, see Section 17.10, “How to Invite Your Neighbors to Join with Nextdoor for Android”.
tap ≡ at the top left corner of the screen to see items in different categories:
Home: Tap Home to see the home screen.
Inbox: Tap Inbox to see private messages that you sent to other neighbors, or that other neighbors sent to you. For help with your inbox, see Section 17.7, “How to Send and Read Private Messages with Nextdoor for Android”.
Neighbors: Tap Neighbors to see a list of Nextdoor members in your neighborhood. For help with the neighbors list, see Section 17.9, “How to Find a Neighbor with Nextdoor for Android”.
Invite Neighbors: Tap Invite Neighbors to invite people to join Nextdoor. For help with invitations, see Section 17.10, “How to Invite Your Neighbors to Join with Nextdoor for Android”.
A “LOCAL” section that includes:
your neighborhood's name: Tapyour neighborhood's nameto see only messages from your neighborhood.Nearby Neighborhoods: Tap Nearby Neighborhoods to see messages from your neighborhood, and also residents of Nearby Neigborhoods. For help with Nearby Neighborhoods settings, see Section 17.11, “How to Change Your Settings with Nextdoor for Android”.
If your city is a member of the Nextdoor City Program, a link to information from your city officials, police department, and/or fire department. For more information on the Nextdoor City Program, go to http://help.nextdoor.com/customer/portal/articles/1148541-what-is-the-nextdoor-city-program-?b_id=98.
A “CATEGORIES” section that includes:
Classifieds: Tap Classifieds to see messages about items that neighbors want to sell or buy.
Crime & Safety: Tap Crime & Safety to see messages about crime and safety.
Documents: Tap Documents to see a list of files that neighbors share with other neighbors.
Files can be in different formats, for example:
Picture or photo files can have names that end with
.GIF,.JPG,.JPEG, or.PNG.Portable Document Format files have names that end with
.PDF. You can open PDF files with software such as Adobe Reader.Microsoft Word format files have names that end with
.DOCor.DOCX. You can open these files with Microsoft Word.Microsoft Excel format files have names that end with
.XLSor.XLSX. You can open these files with Microsoft Excel.
Nextdoor for Android can open files in the above formats. If a neighbor shares a file in a different format, Nextdoor for Android possibly will not open the file.
Free items: Tap Free items to see messages about items that neighbors want to give away for free.
General: Tap General to see messages that do not fit into some other category.
Lost & Found: Tap Lost & Found to see messages about lost or found pets or items.
Recommendations: Tap Recommendations to see messages about companies or services neighbors used, and if the neighbors recommend those companies or services.
A “GROUPS” section that shows a list of the public and private groups of which you are a member. For help with groups, see Section 17.8, “How to Use Groups on Nextdoor for Android”.
post new messages. For help with this, see Section 17.6, “How to Post Public Messages with Nextdoor for Android”.
see notifications of new activity on Nextdoor
tap the ┇ symbol at the top right corner of the screen to see these items:
INVITE NEIGHBORS: Tap INVITE NEIGHBORS to invite neighbors to join Nextdoor. For more help, see Section 17.10, “How to Invite Your Neighbors to Join with Nextdoor for Android”.
REFRESH: Tap REFRESH to update the home screen (to see if new messages were posted).
Note
You can also drag down with your finger from the top of the screen to refresh the screen.
SETTINGS: Tap SETTINGS to change your Nextdoor for Android settings. For help with your Nextdoor for Android settings, see Section 17.11, “How to Change Your Settings with Nextdoor for Android”.
ABOUT: Tap ABOUT to see information about Nextdoor.
The ABOUT information includes:
the version number of the Nextdoor for Android app
Nextdoor's Manifesto
buttons to let you see Nextdoor's Privacy Policy and Member Agreement
HELP: Tap HELP to go to Nextdoor's “help” page. For help with Nextdoor's “help” page, see Section 17.12, “How to Get Help for Nextdoor for Android”.
CONTACT US: Tap CONTACT US to send a message to Nextdoor. For more help, see Section 17.12, “How to Get Help for Nextdoor for Android”.
Notifications are short messages about the newest information posted on Nextdoor, or about private messages that neighbors sent to you.
To see a list of notifications:
Tap the square near the top right right corner of the home screen:
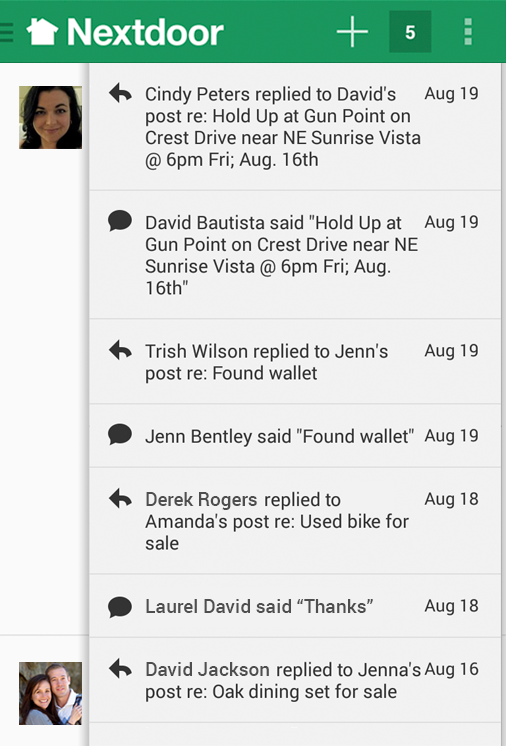
Note
If you see a number in the square, it shows how many notifications you have not read.
A list of message descriptions will come into view at the top right corner of the screen:

Tap on a message description to see the full message, or tap the square again to close the notifications list.
You can also see notifications from Nextdoor for Android in the Android notifications list. To see a list of notifications, swipe down from the top left corner of the screen. You can use your finger to drag up or down to scroll through the list.
The home screen shows public messages and messages posted to your groups. Nextdoor for Android shows the first three lines of each message. If a message is longer than that, you can tap the subject (description) at the top of the message to see the full message:
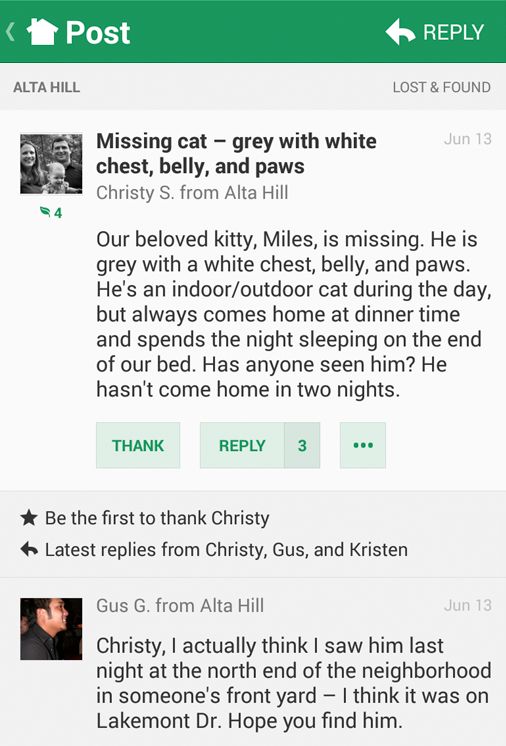
If there are one or more replies to the message, you will see those when you see the full message. To go back to the home screen after you read the message, tap < at the top left corner of the screen.
The list of messages is too long to fit on one screen. But you can use your finger to drag up or down to scroll.
To read only messages in a specified category, tap ≡ at the top left corner of the screen then tap the category:
Home: Tap Home to see the home screen.
Inbox: Tap Inbox to see private messages that you sent to other neighbors, or that other neighbors sent to you. For help with private messages, see Section 16.1.7, “How to Send and Read Private Messages with Nextdoor for iPhone”.
Neighbors: Tap Neighbors to see a list of Nextdoor members in your neighborhood. For help with the neighbors list, see Section 16.1.9, “How to Find a Neighbor with Nextdoor for iPhone”.
A “LOCAL” section that includes:
your neighborhood's name: Tapyour neighborhood's nameto see only messages from your neighborhood.Nearby Neighborhoods: Tap Nearby Neighborhoods to see messages from your neighborhood, and also residents of Nearby Neigborhoods. For help with Nearby Neighborhoods settings, see Section 16.1.11, “How to Change Your Settings with Nextdoor for iPhone”.
If your city is a member of the Nextdoor City Program, a link to information from your city officials, police department, and/or fire department. For more information on the Nextdoor City Program, go to http://help.nextdoor.com/customer/portal/articles/1148541-what-is-the-nextdoor-city-program-?b_id=98.
A “CATEGORIES” section that includes:
Classifieds: Tap Classifieds to see messages about items that neighbors want to sell or buy.
Crime & Safety: Tap Crime & Safety to see messages about crime and safety.
Documents: Tap Documents to see a list of files that neighbors share with other neighbors.
Files can be in different formats, for example:
Picture or photo files can have names that end with
.GIF,.JPG,.JPEG, or.PNG.Portable Document Format files have names that end with
.PDF. You can open PDF files with software such as Adobe Reader.Microsoft Word format files have names that end with
.DOCor.DOCX. You can open these files with Microsoft Word.Microsoft Excel format files have names that end with
.XLSor.XLSX. You can open these files with Microsoft Excel.
Nextdoor for Android can open files in the above formats. If a neighbor shares a file in a different format, Nextdoor for Android possibly will not open the file.
Free items: Tap Free items to see messages about items that neighbors want to give away for free.
General: Tap General to see messages that do not fit into some other category.
Lost & Found: Tap Lost & Found to see messages about lost or found pets or items.
Recommendations: Tap Recommendations to see messages about companies or services neighbors used, and if the neighbors recommend those companies or services.
A “GROUPS” section that shows a list of the public and private groups of which you are a member. For help with groups, see Section 16.1.8, “How to Use Groups on Nextdoor for iPhone”.
Caution
When you tap or , neighbors who can see the initial message can see your name. If you reply to a public message, neighbors who can see the initial message can also see your message.
If residents of Nearby Neighborhoods can see the initial message, they can see your name/message. They can also see some or all of your profile information.
For more information about Nearby Neighborhoods, see Chapter 6, Nearby Neighborhoods. For help with your Nearby Neighborhood settings in Nextdoor for Android, see Section 17.11, “How to Change Your Settings with Nextdoor for Android”.
If you agree with a message or think the information in the message is good, you can tap . will change to , and the message Thanked by you will come into view below the message.
Note
If one or more neighbors tap , you will see a number at the right side of . For example, you will see if three neighbors tapped .
Note
If you tapped by accident (and changed to ), you can tap . The number at the right side of will decrease by 1, and Nextdoor will remove your name from the Thanked by... message.
If you tap , you do not need to reply to the message. (But you can reply if you want to.)
To reply to a public message:
Tap .
Note
If one or more neighbors reply to the message before you do, you will see a number at the right side of button. For example, you will see if two neighbors replied to the message.
An “Add a reply” box will come into view. Use the onscreen keyboard to type your message.
Tap at the top right corner of the screen to send your reply.
Note
To not send a reply, tap at the top left corner of the screen.
If you see a public message that contains bad language, advertising, or other inappropriate information, you can “flag” the message. This tells the lead user(s) for your neighborhood that the message must be reviewed and possibly deleted.
To flag a message:
Tap the subject (description) at the top of the message to see the full message.
Tap below the message.
Tap .
A “Please select a reason” form will come into view.
Tap a reason:
If you tap again, you will see the message .
To post a new public message:
Tap at the top right corner of the screen.
To post a new public message:
Tap . A “CHOOSE NEIGHBORS” screen will come into view.
Select who can see your message:
your neighborhood's nameonly: Tap this if you want only your neighborhood's residents to see your message.your neighborhood's name+ Nearby: Click this if you want Nearby Neighborhood residents to see your message.Note
If no Nearby Neighborhoods are turned on, you will not see this.
After you tap
your neighborhood's name+ Nearby, a list of your Nearby Neighborhoods will come into view. To not send the message to one or more Nearby Neighborhoods, tap to the right of that neighborhood's name.the names of your groups: If you are a member of one or more groups, you will see the groups' names on the list. Click a group name if you want only members of that group to see your message.
Tap at the top right corner of the screen.
Use the onscreen keyboard to type a subject (description) of the message.
Tap in the “Message” box. Use the onscreen keyboard to type your message.
To add a photo to your message:
Tap
at the bottom right corner of the “Write a message” box.To select a photo from your Android device, tap Choose Photo from Gallery, then select a photo. To take a new photo, tap Take a Photo.
Note
To not add a photo to your message, tap .
Tap at the top right corner of the screen. A “CHOOSE A CATEGORY” screen will come into view.
Tap ○ to the right of the best category for your message (Classifieds, Crime & Safety, Free Items, General, Lost & Found, or Recommendations).
To post the message, tap at the top right corner of the screen.
Note
To cancel the message, tap two times, then .
To post a photo:
Tap .
To take a new photo, tap
. To select a photo from your Android, tap .Note
To not add a photo to your message, tap at the top left corner of the screen.
The photo you take or select will come into view.
To use this photo, tap . To take or select a new photo, tap
at the top left corner of the screen to go back one screen.A “WRITE A MESSAGE” screen will come into view.
Tap in the “Add a subject” box. Use the onscreen keyboard to type a subject (description) of the photo.
Tap in the “Write a message” box. Use the onscreen keyboard to type a message about the photo.
Tap at the top right corner of the screen. A “CHOOSE NEIGHBORS” screen will come into view.
Select who can see your photo:
your neighborhood's nameonly: Tap this if you want only your neighborhood's residents to see your photo.your neighborhood's name+ Nearby: Click this if you want Nearby Neighborhood residents to see your photo.Note
If no Nearby Neighborhoods are turned on, you will not see this.
After you tap
your neighborhood's name+ Nearby, a list of your Nearby Neighborhoods will come into view. To not send the photo to one or more Nearby Neighborhoods, tap to the right of that neighborhood's name.the names of your groups: If you are a member of one or more groups, you will see the groups' names on the list. Click a group name if you want only members of that group to see your photo.
Tap at the top right corner of the screen. A “CHOOSE A CATEGORY” screen will come into view.
Tap ○ to the right of the best category for your photo (Classifieds, Crime & Safety, Free Items, General, Lost & Found, or Recommendations).
To post the photo, tap at the top right corner of the screen.
Note
To cancel the message, tap two times, then , then .
To send an urgent alert:
Caution
Only send urgent alerts for crime or safety issues that your neighbors must know about immediately. If applicable, call 911 before you send an urgent alert.
Tap .
Use the onscreen keyboard to type your message.
Note
The message can be no more than 110 characters long. Nextdoor for Android shows the number of available characters at the bottom right corner of the “Write a message” box. If you type more than 110 characters, the number will be red.
To post the message, tap at the top right corner of the screen.
Note
To cancel the message, tap .
To send an invitation to join Nextdoor, tap . For help with invitations, see Section 16.1.10, “How to Invite Your Neighbors to Join with Nextdoor for iPhone”.
When you post a public message, you cannot make changes to that message. But you can delete the message.
To delete a public message that you posted:
Find the message that you want to delete.
Tap the subject (description) of the message to see the full message.
Tap below the message.
Tap .
Tap button.
Note
To not delete the message, tap .
When you tap on a message posted by a neighbor, neighbors who can see the initial message can see your name and message. If you do not want other neighbors to see your information, you can send a private reply.
To send a private reply to a public message:
Tap the subject (description) of the message to see the full message.
Tap below the message.
Tap .
Use the onscreen keyboard to type your message.
To send your message, tap at the top right corner of the screen.
Note
To not send the message, tap at the top left corner of the screen.
You can also send a private message that is not a reply to a public message. For help with this, see Section 16.1.9, “How to Find a Neighbor with Nextdoor for iPhone”.
Nextdoor keeps copies of your private messages in your Inbox.
To read messages in your Inbox:
Tap ≡ at the top left corner of the screen.
Tap Inbox. A list of messages in your Inbox will come into view. You can use your finger to drag up or down to scroll through the list.
To see a full message, tap the subject (description) of the message.
To send a private reply to a message in your Inbox:
While you can see the full message, tap in the “Add a reply...” box at the bottom of the message.
Use the onscreen keyboard to type your reply.
To send your reply, tap at the top right corner of the screen.
Note
To not send the reply, tap at the top left corner of the screen. Tap < at the top left corner of the screen to go back to your Inbox.
You can use Nextdoor for Android to read and post messages in groups of which you are a member.
Note
To see a list of all public groups, to join a group, or to make a new group, use the Nextdoor website. For help with groups on the website, see Chapter 9, Groups.
To read messages in a specified group:
Tap ≡ at the top left corner of the screen.
Tap the group's name in the “GROUPS” section. A list of messages in that group will come into view.
To post a message in a group:
Tap + at the top right corner of the screen to start a new message.
Tap . A “CHOOSE NEIGHBORS” screen will come into view.
Tap ○ to the right of the group's name.
Finish and send the message as usual.
Note
For help with this, see Section 16.1.6, “How to Post Public Messages with Nextdoor for iPhone”.
Tap ≡ at the top left corner of the screen.
Tap Neighbors. A list of neighborhood residents will come into view:
You can use your finger to drag up or down to scroll through the list. Or you can search for a neighbor by their name or street name:
Tap Search by name or street at the top of the screen.
Type part or all of the neighbor's first or last name, or street name. Results will come into view as you type.
When you see the neighbor's name, tap the name. The neighbor's profile screen will come into view:
You can send a neighbor a private message from their profile page.
To send a neighbor a private message:
Tap at the top right corner of their profile page. A new screen will come into view:
Tap in the “Add a subject” box. Type a subject (description) for the message.
Tap in the “Write a message” box. Type your message.
To send your message, Tap at the top right corner of the screen.
Note
To not send the message, tap at the top left corner of the screen.
Nextdoor works best when all your neighbors are members! As a member, you can invite other neighborhood residents to join.
Note
You can also invite people who do not live in your neighborhood to join Nextdoor. When they make their Nextdoor account, they will give Nextdoor their street address. Their account will be automatically added to their neighborhood's Nextdoor site, if it has one. If their neighborhood does not have a Nextdoor site, Nextdoor will invite them to start a site for their neighborhood.
If you know a neighbor's email address, you can use it to invite them to join Nextdoor. This is the fastest procedure to let your neighbor join Nextdoor.
To send an invitation by email:
Tap ≡ at the top left corner of the screen, then tap Invite Neighbors.
Note
Or tap + at the top right corner of the home screen, then tap .
The “ALL CONTACTS” list, which shows information from your Android's Contacts list, will come into view. You can use your finger to drag up or down to scroll through the list. Or you can search for a neighbor by their name or email address:
Tap in the “Add an email or search by name” box near the top of the screen.
Use the onscreen keyboard to type part or all of the neighbor's name. Results will come into view as you type.
Tap ○ to the left of the names of the persons you want to send invitations to.
To send an invitation to an email address that is not on the “ALL CONTACTS” list:
Tap in the “Add an email or search by name” box near the top of the screen.
Use the onscreen keyboard to type the email address.
Tap .
Note
If you want to send an invitation to all the people on your Contacts list, tap at the bottom left corner of the screen.
To change all the email addresses you have selected to not selected, tap at the bottom right corner of the screen.
If you want, repeat the step above to select more email addresses.
Tap at the top right corner of the screen. An “Invitation” screen will come into view. The
Invitingmessage near the top of the screen shows how many email addresses you selected.#person/peopleYou will see this message:
My neighborhood is using a private online network called Nextdoor.your neighborhood's name. On our Nextdoor site, neighbors share community events, recommendations, items for sale, crime reports, ideas about how to improve our neighborhood and more. I think you and your neighborhood could benefit tooIf you want, use the onscreen keyboard to change the message.
When the message is satisfactory, tap at the top right corner of the screen to send the invitation.
Note
To not send the invitation, tap < at the top left corner of the screen, then tap .
You can also use Share This App to send a person an email about Nextdoor. The email includes a link to download Nextdoor for Android.
To use Share This App:
Tap ≡ at the top left corner of the screen.
Tap Share This App.
Tap the Mail icon. A “New Message” screen will come into view.
Tap in the “To” box. Use the onscreen keyboard to type an email address.
Note
Or, to select an email address from your Android Contact list, tap ⊕ at the right side of the “To” box.
Tap in the “Subject” box. Use the onscreen keyboard to type a subject (description) of the message.
You will see the message:
Join @Nextdoor, the private social network for neighborhoods, and start connecting with your neighbors.The message includes a link to download Nextdoor for Android. If you want, use the onscreen keyboard to change the message. But if you want to include the link to download Nextdoor for Android, make sure not to delete or change the link.
When the message is satisfactory, tap at the top right corner of the screen to send the message.
Note
To not send the message, tap at the top left corner of the screen. Then tap to discard the message.
When a neighbor joins Nextdoor, you will see the message neighbor's name joined on the home screen. If you want to, you can welcome the new neighbor to Nextdoor, and/or add a public message.
Caution
When you tap below a message about a new neighbor, Nextdoor members in your neighborhood can see your name. If you tap , Nextdoor members in your neighborhood can see your message.
To welcome a new neighbor, tap below the message about the new neighbor.
Note
If one or more neighbors welcome the new neighbor before you do, you will see a number at the right side of . For example, you will see if two neighbors welcomed the new neighbor.
To send a public message to the neighbor:
Tap below the message about the new neighbor.
Note
If one or more neighbors reply to the message before you do, you will see a number at the right side of . For example, you will see if two neighbors replied to the message.
An “Add a reply” box will come into view. Use the onscreen keyboard to type your message.
To send your reply, tap at the top right corner of the screen.
Note
To not send a reply, tap at the top left corner of the screen.
To change your Nextdoor settings with Nextdoor for Android:
Tap ≡ at the top left corner of the screen.
Tap Settings. A “Settings” screen will come into view:
You can use the “Settings” screen to:
sign out of Nextdoor. To sign out, tap . The message
Are you sure you want to sign out of the app?will come into view. If you want to sign out, tap .Note
If you do not want to sign out, tap .
tell Nextdoor to show your full address or only your street name to your neighbors. To show your full address, make sure Show my full address is set to
ON. To show only your street name, make sure Show my full address is set toOFF.change your profile photo.
To change your profile photo:
Tap CHANGE PROFILE PHOTO.
To take a new photo with your Android, or to select a photo from your Android:
Tap .
To take a new photo, tap
. To select a photo from your Android, tap .Note
To not change your profile photo, tap at the top left corner of the screen.
The photo you take or select will come into view.
To use your Facebook profile photo as your Nextdoor profile photo
Tap .
If you are not signed in to your Facebook account, use the onscreen keyboard to type your email address or phone number and password. Tap .
change your Nearby Neighborhood settings:
If you want to see messages from Nearby Neighborhoods, make sure Show posts from nearby neighborhoods is set to
ON. If you do not want to see messages from Nearby Neighborhoods, make sure Show posts from nearby neighborhoods is set toOFF.To change which Nearby Neighborhoods are turned on:
Tap Customize nearby neighborhoods. A map of your neighborhood and its Nearby Neighborhoods will come into view. You will see a list of Nearby Neighborhoods at the right side of the map.
To see messages from a specified neighborhood, make sure the ON/OFF button to the right of its name is set to
ON. If you do not want to see messages from a specified neighborhood, make sure the ON/OFF button to the right of its name is set toOFF.When your Nearby Neighborhoods settings are correct, tap < at the top left corner of the screen.
To see more information about Nearby Neighborhoods, tap LEARN MORE.
tell Nextdoor if you want to receive mobile notifications (with Nextdoor for Android) or email notifications for different message categories.
You can receive notifications with Nextdoor for Android, email, or both, for these categories:
Replies to my posts
Thanks to my posts
Neighbors welcoming me
Urgent post alerts
New neighbors joining
Crime & Safety posts
Classifieds posts
Free items posts
Lost & Found posts
Recommendations posts
Neighbor posts
Nearby neighbor posts
Neighbor replies
Nearby neighbor replies
You can receive notifications with Nextdoor for Android for these categories:
Private messages
Daily activity summary
If the mobile (
) or email () icon to the right of a category is green, notifications are on for that mode and category. If the icon is gray, notifications are off for that mode and category. To change the notification setting for a category, tap or .
If you have a question or problem related to Nextdoor:
Tap ≡ at the top left corner of the screen.
Tap Help. A “Nextdoor | FAQ” (Frequently Asked Questions) screen will come into view:
The “Nextdoor | FAQ” screen has a list of categories, such as “The Basics,” “Account and Settings,” and “Nextdoor for Android.”
You can use your finger to drag up or down to scroll through the list of categories on the “Nextdoor | FAQ” screen. To see more information about a category, tap the category's name. A list of articles in that category will come into view. Tap an article's name to see the full article.
If you do not see an article with the information you want, tap in the “Search” box at the top of the screen. Use the onscreen keyboard to type a word or phrase (such as
password). Then tap at the bottom right corner of the screen. A list of articles that contain your word or phrase will come into view.To close the “Nextdoor | FAQ” screen, tap at the top left corner of the screen.
You can send a message to Nextdoor's technical support department:
if you cannot find the information you want on the “Nextdoor | FAQ” screen.
if you have a problem or see an error message more than one time in Nextdoor for Android.
Note
Before you send a message about a problem or error message, sign out of Nextdoor for Android, then sign back in. This will possibly repair the problem.
to tell Nextdoor about a change that you want in Nextdoor for Android.
To send a message to Nextdoor's technical support department:
Tap ≡ at the top left corner of the screen.
Tap Contact Us.
To tell Nextdoor about a problem or error message, tap .
To tell Nextdoor about a change that you want in Nextdoor for Android, tap .
Nextdoor for Android will start a new email message. The “To,” “From,” and “Subject” boxes will be completed for you. The body of the message will contain
I found this issue:orI have this feedback:.Tap in the body of the message, below
I found this issue:orI have this feedback:. Use the onscreen keyboard to type a message about the problem or the change that you want.To send your message, tap at the top right corner of the screen.
Note
To not send the message, tap at the top left corner of the screen. Then tap to discard the message.